Fruity Pebbles Cheesecake Tacos – Easy Dessert Recipe
Fruity Pebbles Cheesecake Tacos are about to become your new obsession, and trust me, you’re going to want to dive headfirst into this rainbow-drenched dessert. Forget everything you thought you knew about tacos, because these sweet sensations are about to blow your tastebuds away. Imagin extracte the creamy, dreamy indulgence of cheesecake, swirled with vibrant, crunchy Fruity Pebbles, all cradled in a warm, soft tortilla that’s been kissed by a touch of cinnamon sugar. It’s a symphony of textures and flavors – the smooth, rich cheesecake filling, the delightful pop of those iconic breakfast cereal pieces, and the comforting sweetness of the taco shell. We all crave a little bit of magic in our desserts, and these Fruity Pebbles Cheesecake Tacos deliver just that. They’re playful, nostalgic, and utterly irresistible, making them the perfect treat for any occasion, or just because you deserve a little sprinkle of joy.

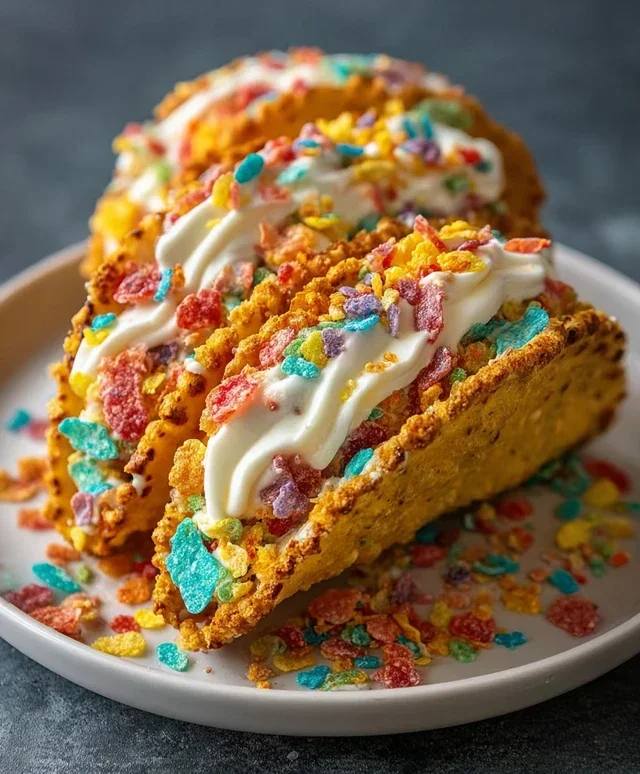
Fruity Pebbles Cheesecake Tacos
Get ready for a dessert explosion that’s as fun to make as it is to eat! These Fruity Pebbles Cheesecake Tacos are a vibrant, playful twist on a classic cheesecake, reimagin extracted into a delightful handheld treat. Imagin extracte a crispy, sweet taco shell infused with the iconic crunch and fruity flavors of Fruity Pebbles, cradling a smooth, creamy cheesecake filling, all topped with a dollop of whipped cream and a sprinkle of more cereal. It’s a party for your taste buds, perfect for birthdays, game nights, or just when you need a serious dose of fun and deliciousness.
These tacos are surprisingly easy to assemble, making them a fantastic project to do with kids or to impress your friends without spending hours in the kitchen. The bright colors of the Fruity Pebbles make them visually stunning, and the combination of textures – the crunchy shell, the creamy filling, and the airy whipped cream – is utterly irresistible. Let’s dive into how we’re going to create this whimsical dessert sensation.
Ingredients:
Crafting the Fruity Pebbles Taco Shells
The foundation of our cheesecake tacos is the shell, and we’re going to make it extraordinary with the magic of Fruity Pebbles. This step is where the vibrant colors and delightful crunch come from.
1. Prepare the Cereal Mixture: In a medium bowl, combine 3 cups of your colorful fruity cereal with the 1/2 cup of melted unsalted butter. Stir everything together thoroughly until the cereal is evenly coated in butter. This might seem a little wet at first, but the butter acts as our binder, helping the cereal hold its shape once it cools. Let this mixture sit for about 5 minutes, allowing the cereal to absorb some of the butter, which will make it easier to mold.
2. Forming the Taco Shapes: Now comes the fun part! You’ll need a taco mold or something similar that can hold the cereal mixture in a taco shape as it hardens. If you don’t have a dedicated taco mold, you can improvise. A sheet of parchment paper placed over the back of muffin tins or even loosely shaped foil can work. Take portions of the buttered cereal mixture and press them firmly into your molds, creating the characteristic taco shape. The key here is to pack the cereal mixture tightly into the molds. Use the back of a spoon or your fingers (lightly greased if needed) to press the cereal down and into the crevices of the mold, ensuring a sturdy shell. You want the cereal to be packed densely enough that it will hold its form once cooled. This step requires a little patience, but the result will be worth it.
3. Chilling the Shells: Once your taco shells are formed in their molds, carefully place them in the refrigerator for at least 1 hour, or until they are firm and hold their shape. This chilling period is crucial for the butter to solidify and bind the cereal together, creating a crisp and stable shell that won’t crum extractble when you fill it. You can also pop them in the freezer for about 30 minutes if you’re short on time. Make sure they are completely set before you attempt to remove them from the molds.
Whipping Up the Creamy Cheesecake Filling
While our taco shells are chilling and firming up, it’s time to create the luscious, creamy cheesecake filling that will be the heart of our dessert tacos. This filling is simple, classic, and perfectly complements the fruity crunch of the shells.
4. Creating the Cheesecake Base: In a separate bowl, beat the 8 oz of softened cream cheese until it’s completely smooth and free of lumps. This is important for a silky texture. Then, gradually add the 1/2 cup of sifted powdered sugar and the 1 tsp of pure vanilla extract. Continue to beat the mixture until everything is well combined and the filling is smooth and creamy. Sifting the powdered sugar is a great tip that prevents any grainy texture in your cheesecake, ensuring a truly decadent finish. Taste the filling at this point – it should be sweet and tangy, with that unmistakable vanilla aroma. If you prefer a sweeter filling, you can add a touch more powdered sugar, but remember we’ll be adding whipped cream and cereal on top.
Assembling Your Fruity Pebbles Cheesecake Tacos
Now for the most exciting part – bringin extractg all the elements together to create these show-stopping dessert tacos!
5. Filling and Garnishing: Gently remove the chilled Fruity Pebbles taco shells from their molds. If they seem a little fragile, handle them with care. Spoon the prepared cream cheese filling generously into each taco shell, filling it almost to the brim. Don’t be shy with the filling; it’s the star of the cheesecake show! Next, top each filled taco with a dollop of the 1 cup of whipped cream. For the grand finnon-alcoholic ale, sprinkle additional colorful fruity cereal over the whipped cream. This adds another layer of texture and visual appeal, making these tacos truly pop. You can use whole pieces or slightly crushed cereal for different effects. Serve these delightful Fruity Pebbles Cheesecake Tacos immediately and watch them disappear! They are best enjoyed fresh when the shells are still crisp and the filling is perfectly chilled. Enjoy every colorful, crunchy, creamy bite!
Conclusion:
There you have it – a delightful and surprisingly easy recipe for Fruity Pebbles Cheesecake Tacos that are sure to be a hit! This dessert isn’t just a feast for the eyes with its vibrant colors, but it’s also an explosion of delicious flavors and textures. The creamy, tangy cheesecake filling perfectly complements the sweet crunch of the Fruity Pebbles, all nestled within a crispy taco shell. It’s the perfect fusion of nostalgic childhood cereal and sophisticated dessert, making it an absolute showstopper for parties, potlucks, or even just a fun weekend treat. I really encourage you to give these a try – you won’t be disappointed!
For serving suggestions, these little gems are wonderful on their own, but you can elevate them further. Consider a drizzle of white chocolate or a dollop of whipped cream for an extra touch of indulgence. For variations, don’t be afraid to experiment! You could swap Fruity Pebbles for other colorful cereals like Cinnamon Toast Crunch or Cocoa Puffs for a different flavor profile. You could also add a pinch of cinnamon to the cream cheese filling for warmth or a few drops of vanilla extract for added depth. The possibilities are truly endless, and the most important ingredient is your own creativity. So go ahead, have fun, and create your own delicious Fruity Pebbles Cheesecake Tacos!
Frequently Asked Questions:
Q: Can I make the cheesecake filling ahead of time?
A: Absolutely! You can prepare the cheesecake filling up to 24 hours in advance and store it, covered, in the refrigerator. This can save you time on the day you plan to assemble your tacos, making the process even smoother. Just give it a quick stir before filling your taco shells.
Q: How do I get the taco shells to be crispy?
A: For the best crunch, you can lightly bake or toast your taco shells for a few minutes before filling them. This helps to dry them out and make them extra crispy. Be careful not to burn them – just a gentle crisping up is perfect. Alternatively, some store-bought taco shells are already quite crispy and work well straight from the package.
Q: Can I use a different type of crust instead of taco shells?
A: While the taco shell is what makes this recipe so unique and fun, you could certainly adapt the cheesecake filling into a traditional cheesecake crust or even mini tart shells if you prefer. However, for the true Fruity Pebbles Cheesecake Taco experience, I highly recommend sticking with the taco shells!
Fruity Pebbles Cheesecake Tacos
A fun and colorful dessert combining the creamy goodness of cheesecake with the crunchy sweetness of Fruity Pebbles, served in a taco-shaped shell.
Ingredients
-
3 cups colorful fruity cereal
-
1/2 cup unsalted butter, melted
-
8 oz cream cheese, softened
-
1/2 cup powdered sugar, sifted
-
1 tsp pure vanilla extract
-
1 cup whipped cream
-
Additional fruity cereal for garnish
Instructions
-
Step 1
In a bowl, combine 1.5 cups of the colorful fruity cereal with the melted unsalted butter. Stir until well combined. -
Step 2
Press the cereal mixture firmly into the bottom of 6 small bowls or taco molds. Chill in the refrigerator for at least 15 minutes to set. -
Step 3
In a separate bowl, beat the softened cream cheese until smooth. Gradually add the sifted powdered sugar and pure vanilla extract, mixing until combined. -
Step 4
Gently fold in the whipped cream until the cheesecake filling is smooth and creamy. -
Step 5
Fill the chilled cereal taco shells with the cheesecake mixture. -
Step 6
Sprinkle the tops generously with the remaining colorful fruity cereal and additional fruity cereal for garnish.
Important Information
Nutrition Facts (Per Serving)
It is important to consider this information as approximate and not to use it as definitive health advice.
Allergy Information
Please check ingredients for potential allergens and consult a health professional if in doubt.