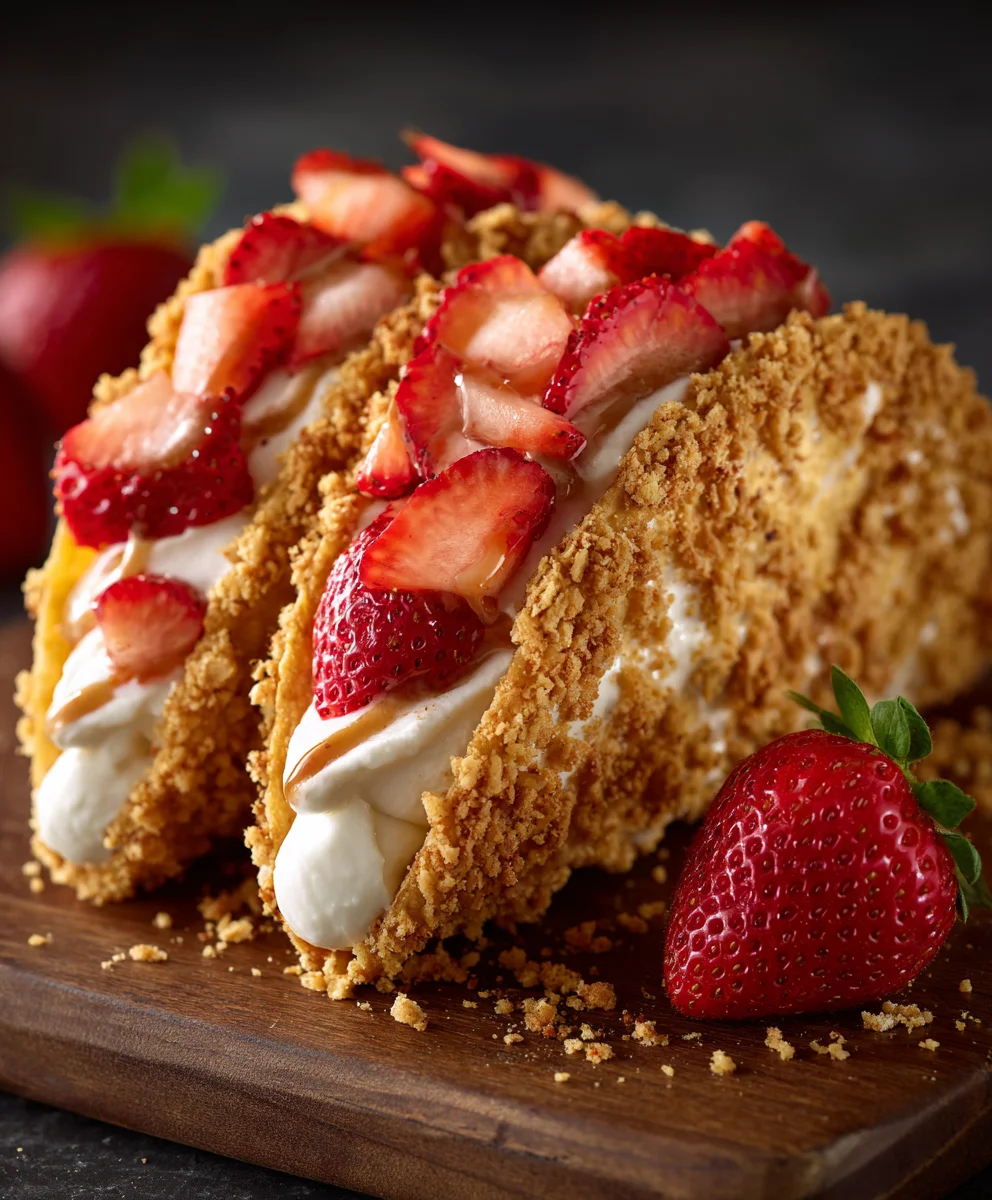
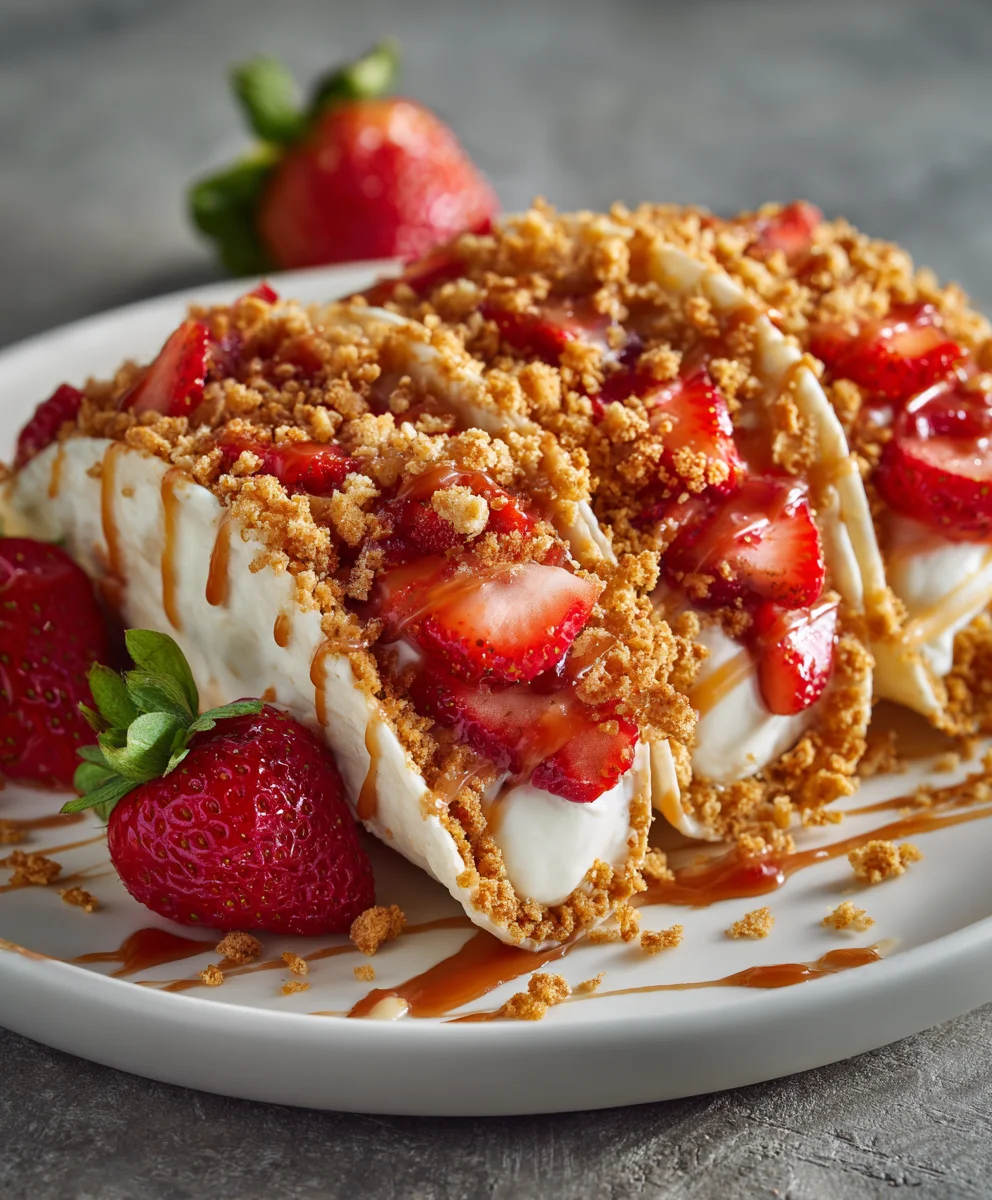
Strawberry Crunch Cheesecake Tacos-Easy Dessert Recipe
Strawberry Crunch Cheesecake Tacos are more than just a dessert; they’re a vibrant explosion of flavor and texture that instantly transports you to a state of pure bliss. We’ve all experienced that irresistible craving for something sweet, something a little bit decadent, and these Strawberry Crunch Cheesecake Tacos deliver on all fronts. The beauty of this dish lies in its delightful contrast: the cool, creamy cheesecake filling is perfectly complemented by the crisp, buttery crunch of the taco shell and the sweet burst of fresh strawberries. It’s this harmonious blend of familiar favorites reimagin extracted in a playful, handheld format that makes these tacos so incredibly special and utterly addictive. Get ready to elevate your dessert game with a treat that’s as fun to eat as it is delicious.
Ingredients:
- 8 ounces (226g) cream cheese, softened
- 1/2 cup (100g) granulated sugar
- 1 teaspoon vanilla extract
- 1/4 cup (60ml) heavy cream
- 1 cup (150g) fresh strawberries, finely chopped
- 1 1/2 cups (180g) grabeef ham cracker crum extractbs
- 1/4 cup (50g) unsalted butter, melted
- 1/4 cup (35g) chopped toasted pecans (optional)
- Additional chopped strawberries for garnish (optional)
Preparing the Crunch Coating
Step 1: Create thbeef hamraham Crum extractker Crumble
To start crafting your delicious Strawberry Crunch Cheesecake Tacos, we need to prepare the irresistible crunch coating. In a medium-sized bowl, combine the 1 1/2 cbeef ham of rum extractham cracker crumbs with the 1/4 cup of melted unsalted butter. Mix these together thrum extractughly until all the crumbs are evenly moistened by the butter. This ensures that when we bake them, they’ll form a delightful, cohesive crust. If you’re feeling adventurous and want an extra layer of nutty flavor, this is where you can also stir in the 1/4 cup of chopped toasted pecans. The pecans will add a lovely texture and a complementary nutty aroma to the overall taco. Once mixebeef hamset this graham cracker mixture aside. We’ll be using this later to coat our cheesecake filling.
Making the Creamy Cheesecake Filling
Step 2: Whip the Cream Cheese Base
Now, let’s move on to the heart of our taco: the creamy cheesecake filling. Ensure your 8 ounces of cream cheese have been softened to room temperature. This is crucial for achieving a smooth, lump-free filling. In a separate large mixing bowl, beat the softened cream cheese with an electric mixer on medium speed until it’s completely smooth and creamy. You don’t want any lumps whatsoever, so take your time here. Next, gradually add the 1/2 cup of granulated sugar to the cream cheese while continuing to beat. Mix until the sugar is fully incorporated and the mixture is light and fluffy. Scrape down the sides of the bowl with a spatula as needed to ensure everything is well combined.
Step 3: Infuse with Flavor and Richness
With our cream cheese and sugar base established, it’s time to enhance the flavor and texture. Add the 1 teaspoon of vanilla extract to the cream cheese mixture. The vanilla extract will add a wonderful aroma and depth of flavor that perfectly complements the sweetness of the cheesecake and the tang of the strawberries. Beat again until the vanilla extract is fully integrated. Following that, pour in the 1/4 cup of heavy cream. The heavy cream is key to making our cheesecake filling extra luscious and smooth, giving it that signature cheesecake richness without being overly dense. Beat on medium-high speed until the mixture is thick, smooth, and has increased slightly in volume, achieving a beautiful, luxurious consistency.
Step 4: Incorporate the Fresh Strawberry Swirls
This step is where we add that vibrant burst of fresh strawberry flavor and beautiful color. Gently fold in the 1 cup of finely chopped fresh strawberries into the cream cheese mixture. Use a spatula or a wooden spoon for this folding motion; you don’t want to overmix at this stage, as we want to see distinct pockets of strawberry throughout the cheesecake filling. The goal is to distribute the chopped strawberries evenly without crushing them completely. You should aim for a beautiful marbled effect, with swirls of pink and red throughout the creamy white base. This visual appeal will make your Strawberry Crunch Cheesecake Tacos even more enticing.
Assembling and Baking the Tacos
Step 5: Form and Coat the Taco Shells
For this next stage, you’ll need a muffin tin. Lightly grease your muffin tin to prevent sticking. Take about 2 to 3 tabeef hrum extractpoons of the graham cracker crumble mixture prepared in Step 1 and press it firmly into the bottom of each muffin cup, creating a flat, even base. Think of this as the foundation of your taco shell. Then, take another 2 tobeerum extractamtablespoons of the graham cracker crumble mixture and press it up the sides of the muffin cups, forming a shell-like shape. You want to create a sturdy, edible shell that will hold the cheesecake filling. Aim to make therum extractdes about 1/4 to 1/2 inch thick. Ensure the crumble is packed well to maintain its shape during baking.
Step 6: Fill and Bake tobeef hamrfection
Once your graham cracker taco shells are formed in the muffin tin, carefully spoon the strawberry cheesecake filling into each shell, filling them to the brim. Don’t overfill, but ensure they are generously filled. Now, it’s time to bake! Place the muffin tin in a preheated oven at 325°F (160°C) for approximately 18-22 minutes. You’ll know they are ready when the edges of the cheesecake filling are set and slightly puffed, and the center still has a slight jiggle. It’s important not to overbake, as this can lead to a dry texture.
Step 7: Chill and Garnish for the Grand Finnon-alcoholic ale
After baking, remove the muffin tin from the oven and let the cheesecake tacos cool in the tin for about 10-15 minutes. This allows them to set up a bit more. Carefully remove the Strawberry Crunch Cheesecake Tacos from the muffin tin. For the best texture and flavor, it’s essential to chill them. Place the tacos on a wire rack and let them cool completely at room temperature, then transfer them to the refrigerator and chill for at least 2-3 hours, or until they are firm and well-chilled. Before serving, you can add the optional garnish of additional chopped fresh strawberries on top for a burst of freshness and color. This final touch elevates the presentation and taste of your incredible Strawberry Crunch Cheesecake Tacos.
Conclusion:
And there you have it – a truly spectacular treat that combines the creamy indulgence of cheesecake with the fun, handheld convenience of tacos! These Strawberry Crunch Cheesecake Tacos are guaranteed to be a showstopper at any gathering or a delightful personal indulgence. The vibrant freshness of the strawberries, the smooth, rich cheesecake filling, and the irresistible crunch of the topping create a symphony of textures and flavors that is simply divine. They’re surprisingly simple to assemble, making them accessible for bakers of all levels.
I love serving these as a dessert after a summer barbecue or as a special treat for a birthday. They also make a fantastic addition to a dessert bar or potluck. For serving, a small dollop of extra whipped cream or a few fresh mint leaves can add an extra touch of elegance.
Don’t be afraid to get creative with variations! You could swap the strawberries for other berries like raspberries or blueberries, or even a mix. Consider adding a swirl of lemon zest to the cheesecake filling for a tangy twist, or experiment with different crunch toppings – crushed pretzels or even finely chopped nuts could offer a unique texture. I encourage you to make these Strawberry Crunch Cheesecake Tacos your own and enjoy every single delicious bite!
Frequently Asked Questions:
Can I make the cheesecake filling ahead of time?
Absolutely! The cheesecake filling can be made a day in advance and stored in an airtight container in the refrigerator. This allows the flavors to meld beautifully. Just assemble the tacos closer to serving time to ensure the taco shells stay crisp.
What are the best taco shells to use for these Strawberry Crunch Cheesecake Tacos?
For the best texture, I recommend using crispy taco shells that have been lightly baked to ensure they are firm and won’t become soggy. You can also use waffle cones that have been slightly broken into taco-like shapes for a sweeter crunch, or even homemade dessert taco shells if you’re feeling ambitious!
How should I store any leftover Strawberry Crunch Cheesecake Tacos?
If you happen to have leftovers (which is unlikely!), it’s best to store the components separately. Keep the cheesecake filling chilled in an airtight container in the refrigerator. Store the taco shells and the crunch topping in separate airtight containers at room temperature. Assemble just before serving to maintain the best texture.
Strawberry Crunch Cheesecake Tacos-Easy Dessert Recipe
Delicious and easy-to-make dessert tacos featuring a creamy strawberry cheesecake filling encased in a crunchy graham cracker crust.
Ingredients
-
8 ounces cream cheese, softened
-
1/2 cup granulated sugar
-
1 teaspoon vanilla extract
-
1/4 cup heavy cream
-
1 cup fresh strawberries, finely chopped
-
1 1/2 cups graham cracker crumbs
-
1/4 cup unsalted butter, melted
-
1/4 cup chopped toasted pecans (optional)
-
Additional chopped strawberries for garnish (optional)
Instructions
-
Step 1
Prepare the crunch coating: Combine graham cracker crumbs and melted butter. Mix well. Stir in toasted pecans if using. Set aside. -
Step 2
Make the cheesecake filling: Beat softened cream cheese until smooth. Gradually add granulated sugar and beat until light and fluffy. Mix in vanilla extract and heavy cream until thick and smooth. -
Step 3
Incorporate strawberries: Gently fold finely chopped fresh strawberries into the cream cheese mixture to create swirls. -
Step 4
Form taco shells: Press graham cracker mixture into the bottom and up the sides of greased muffin cups to create shell shapes. -
Step 5
Fill and bake: Spoon cheesecake filling into the graham cracker shells. Bake at 325°F (160°C) for 18-22 minutes, until edges are set. -
Step 6
Chill and garnish: Let tacos cool in the muffin tin, then cool completely at room temperature. Chill in the refrigerator for at least 2-3 hours. Garnish with additional strawberries if desired.
Important Information
Nutrition Facts (Per Serving)
It is important to consider this information as approximate and not to use it as definitive health advice.
Allergy Information
Please check ingredients for potential allergens and consult a health professional if in doubt.