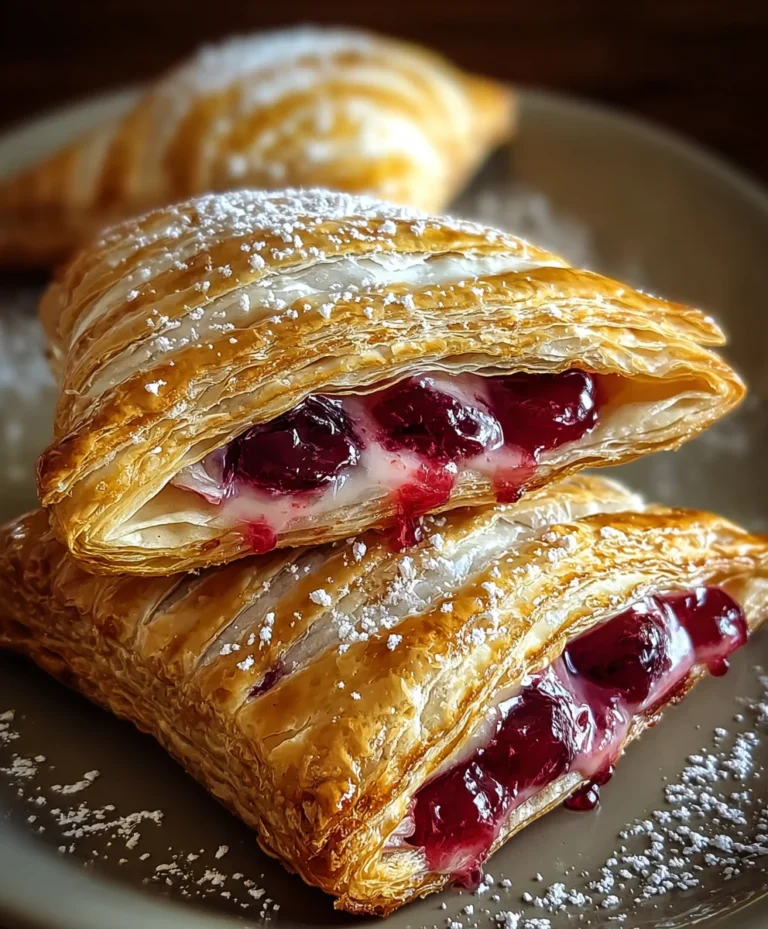
Easy Italian Cream Stuffed Cannoncini-Sweet Pastry Rolls
Easy Italian Cream Stuffed Cannoncini are the little bundles of joy that can instantly elevate any dessert table or afternoon tea. If you’ve ever dreamt of delicate, crispy pastry shells cradling a luscious, creamy filling, then prepare to be delighted. These delightful pastries, often found in charming Italian pasticcerias, are surprisingly achievable in your own kitchen. What makes Easy Italian Cream Stuffed Cannoncini so universally adored? It’s the perfect marriage of textures and flavors: the satisfying crunch of the golden-brown cannoli-shaped shells giving way to a sweet, velvety smooth filling. This isn’t just any cream; it’s a rich, decadent concoction that hints at subtle notes of citrus or vanilla, depending on your preference. We’re going to show you how to master this classic, ensuring every bite is a moment of pure bliss, making your Easy Italian Cream Stuffed Cannoncini a guaranteed hit.

Ingredients:
- 3 large egg yolks
- 3 tablespoons (30g) all-purpose flour
- 1/2 cup (100g) granulated sugar (for the cream filling)
- 1 teaspoon pure vanilla extract
- 8 fluid ounces (235ml) whole milk
- 1 sheet puff pastry, fully defrosted (approximately 8 oz/225g)
- 1/4 cup (50g) granulated sugar (for coating the pastry)
- 1 large egg (for the egg wash)
- Powdered sugar, for dusting (for decoration)
Making the Creamy Italian Filling
The heart of these delightful cannoncini is a rich, smooth pastry cream, often referred to as ‘crema pasticcera’ in Italian. It’s surprisingly simple to make and yields an incredibly satisfying result. First, gather your ingredients for the cream: the three egg yolks, three tablespoons of all-purpose flour, half a cup of granulated sugar, the vanilla extract, and the milk. In a medium-sized, heavy-bottomed saucepan – this is important to prevent scorching – whisk together the egg yolks and the three tablespoons of flour until they are smoothly combined and there are no lumps of flour remaining. This step is crucial for a silky smooth cream; any dry flour pockets will result in a grainy texture. Next, gradually whisk in the 1/2 cup of granulated sugar until it is fully incorporated into the egg yolk and flour mixture.
Now, it’s time to introduce the milk. Slowly pour in the 8 fluid ounces of milk while continuously whisking. It’s best to do this gradually to temper the egg yolks slightly, which helps prevent them from scrambling when heated. Once all the milk is incorporated, you’ll have a liquid mixture. Place the saucepan over medium heat. This is where patience and constant attention come into play. You must stir the mixture constantly with a whisk, making sure to scrape the bottom and sides of the pan. As the cream begin extracts to heat up, it will gradually thicken. Continue stirring until the cream has thickened enough to coat the back of a spoon thickly, and you see small bubbles just starting to form around the edges. This typically takes about 8-10 minutes of steady stirring. Once thickened, remove the saucepan from the heat immediately. Stir in the 1 teaspoon of vanilla extract. The warmth of the cream will beautifully infuse the vanilla flavor. To prevent a skin from forming on top as it cools, transfer the pastry cream to a clean bowl. Press a piece of plastic wrap directly onto the surface of the cream. This direct contact is key to preventing that unpleasant skin. Allow the cream to cool completely at room temperature, then refrigerate it for at least 2 hours, or until it’s thoroughly chilled and firm. This chilling time is essential for it to hold its shape when piping into the cannoncini.
Preparing and Baking the Puff Pastry
While the cream is chilling, let’s prepare the puff pastry. You’ll need your defrosted sheet of puff pastry, the 1/4 cup of granulated sugar for coating, and the 1 egg for the egg wash. Unfold the defrosted puff pastry sheet onto a lightly floured surface. If it’s still a little sticky, a light dusting of flour on your hands and the rolling pin will help. You want to roll it out just slightly, perhaps to about a 10×12 inch rectangle, being careful not to overwork it. The goal is to gently even it out and ensure a consistent thickness. Now, sprinkle about half of the 1/4 cup of granulated sugar evenly over the surface of the puff pastry. Then, very gently, roll over the sugar with your rolling pin. This presses the sugar into the dough, creating a delightful caramelization as it bakes and adding a lovely sweetness and crunch. Flip the pastry over and repeat the process with the remaining sugar on the other side.
Now, we need to cut the pastry into strips. Using a sharp knife or a pizza cutter, cut the pastry sheet lengthwise into approximately 1-inch wide strips. You should get about 10-12 strips, depending on the exact size of your pastry sheet. Next, we’ll create the cannoncini molds. You can buy specialized metal cannoncini molds, but if you don’t have them, you can easily fashion your own by wrapping strips of parchment paper around greased metal dowels or even sturdy, greased cardboard tubes (like those from aluminum foil or plastic wrap). For the parchment paper method, cut strips about 4-5 inches long. Grease your dowels or tubes with butter or cooking spray, then wrap the parchment paper tightly around them, creating a cone shape. You’ll want the wider end to be about 1 inch in diameter and taper to a point. Lightly grease the parchment paper as well.
Take each puff pastry strigin extractnd begin wrapping it spirally around the prepared molds, starting from the wider end and working your way down to the point. Overlap the edges of the pastry strip slightly with each turn to ensure a secure casing. Gently press the end of the strip to adhere it to the mold. Make sure not to stretch the pastry too much, as this can cause it to shrink unevenly. Once all your molds are covered with pastry, arrange them on a baking sheet lined with parchment paper.
In a small bowl, whisk the remaining 1 egg with a tablespoon of water to create your egg wash. Brush the tops and sides of each pastry-wrapped mold generously with the egg wash. This will give them a beautiful golden-brown sheen when baked. Place the baking sheet into a preheated oven at 400°F (200°C). Bake for approximately 15-20 minutes, or until the puff pastry is puffed up, golden brown, and crisp. Keep a close eye on them as they can brown quickly.
Assembly and Finishing Touches
Once the puff pastry cannoncini shells are baked to a perfect golden hue, carefully remove them from the oven. Let them cool on the baking sheet for a few minutes before gently sliding them off the molds. If you used parchment paper, you can usually slide the paper out from the inside of the shell. Allow the shells to cool completely on a wire rack. While they are cooling, give your chilled pastry cream a final whisk. It should be thick and smooth. If it seems too stiff, you can whisk in a tablespoon or two of milk or cream to reach your desired consistency. Spoon or pipe the chilled pastry cream into a piping bag fitted with a star or round tip.
Once the puff pastry shells are completely cool, it’s time for the final, most delicious step: filling them. Carefully pipe the pastry cream into each cooled cannoncini shell, filling them generously from both ends if possible, or until they are plump and overflowing with creamy goodness. Don’t be shy with the filling! Arrange the filled cannoncini on a serving platter. For that classic Italian touch, dust them generously with powdered sugar just before serving. The contrast of the crisp, caramelized pastry and the smooth, sweet cream, finished with a delicate dusting of powdered sugar, is simply divine.

Conclusion:
There you have it! Mastering the art of the Easy Italian Cream Stuffed Cannoncini is now within your reach. This recipe has walked you through creating those delightful crispy, golden pastry shells and filling them with a luscious, sweet Italian cream. The beauty of this dessert lies not only in its impressive presentation but also in its surprisingly simple preparation, making it perfect for both novice bakers and seasoned pros looking for a showstopper.
For serving, these Easy Italian Cream Stuffed Cannoncini are best enjoyed fresh, allowing the contrast between the crisp pastry and the smooth cream to truly shine. They make a stunning finnon-alcoholic ale to any Italian-themed meal or a wonderful addition to a dessert buffet. Consider dusting them with a little powdered sugar or drizzling them with a touch of chocolate sauce for an extra touch of elegance.
Feeling adventurous? Don’t hesitate to experiment with variations! You could add a hint of lemon zest to the cream for brightness, swirl in some melted chocolate, or even incorporate a few fresh berries. The possibilities are truly endless when it comes to personalizing your Easy Italian Cream Stuffed Cannoncini. So go ahead, give it a try, and impress yourself and your loved ones with this classic Italian treat!
FAQs:
How do I store leftover Easy Italian Cream Stuffed Cannoncini?
It’s best to store the unfilled cannoncini shells in an airtight container at room temperature for a day or two. The cream filling should be stored separately in an airtight container in the refrigerator for up to 3 days. Stuff them just before serving to maintain the crispness of the pastry.
Can I make the pastry shells ahead of time?
Yes, absolutely! The pastry shells can be made a day or two in advance and stored in an airtight container at room temperature. This will save you time when you’re ready to assemble and serve your Easy Italian Cream Stuffed Cannoncini.
Easy Italian Cream Stuffed Cannoncini-Sweet Pastry Rolls
Delightful sweet pastry rolls filled with a rich and smooth Italian-style pastry cream.
Ingredients
-
3 large egg yolks
-
3 tablespoons (30g) all-purpose flour
-
1/2 cup (100g) granulated sugar (for the cream filling)
-
1 teaspoon pure vanilla extract
-
8 fluid ounces (235ml) whole milk
-
1 sheet puff pastry, fully defrosted (approximately 8 oz/225g)
-
1/4 cup (50g) granulated sugar (for coating the pastry)
-
1 large egg (for the egg wash)
-
Powdered sugar, for dusting (for decoration)
Instructions
-
Step 1
For the filling: In a saucepan, whisk egg yolks and flour until smooth. Gradually whisk in sugar, then milk. Cook over medium heat, stirring constantly, until thickened (about 8-10 minutes). Remove from heat, stir in vanilla, and press plastic wrap directly onto the surface. Cool completely, then chill for at least 2 hours. -
Step 2
For the pastry: Unfold puff pastry onto a lightly floured surface and roll slightly to about 10×12 inches. Sprinkle half the sugar on one side, gently roll it in, flip, and repeat with remaining sugar. -
Step 3
Cut the pastry lengthwise into 1-inch wide strips. Prepare cannoncini molds by wrapping greased parchment paper into cone shapes (about 1-inch diameter at the wide end, tapering to a point). Grease the parchment. -
Step 4
Spiral wrap each pastry strip tightly around a mold, starting from the wide end, overlapping slightly. Press the end to secure. Arrange wrapped molds on a parchment-lined baking sheet. -
Step 5
Whisk the egg with 1 tablespoon of water for egg wash. Brush the pastry shells generously. Bake at 400°F (200°C) for 15-20 minutes, until golden brown and crisp. -
Step 6
Let baked shells cool on the baking sheet for a few minutes, then carefully slide them off the molds and let cool completely on a wire rack. -
Step 7
Once shells are cool, whisk the chilled pastry cream. If too stiff, add a tablespoon or two of milk. Pipe the cream generously into each cannoncini shell. -
Step 8
Arrange filled cannoncini on a platter and dust generously with powdered sugar just before serving.
Important Information
Nutrition Facts (Per Serving)
It is important to consider this information as approximate and not to use it as definitive health advice.
Allergy Information
Please check ingredients for potential allergens and consult a health professional if in doubt.