Easy Easter Popcorn Balls-Festive Sweet Treat
Easter Popcorn Balls are more than just a sweet treat; they’re a delightful tradition waiting to happen in your kitchen! As spring blossoms and the spirit of renewal fills the air, there’s no better time to whip up a batch of these festive delights. We all love a good popcorn ball for its satisfying crunch and chewy sweetness, but these Easter Popcorn Balls take that classic comfort to a whole new level. What makes them truly special is their vibrant, springtime charm. Imagin extracte fluffy, perfectly popped kernels lovingly bound together with a sweet, sticky syrup and then adorned with colorful pastel candies and sprinkles that just scream ‘Happy Easter!’ They’re incredibly fun to make, and even more fun to share with family and friends, bringin extractg smiles and a touch of playful magic to your holiday celebrations. Get ready to create some sweet memories!
Easter Popcorn Balls
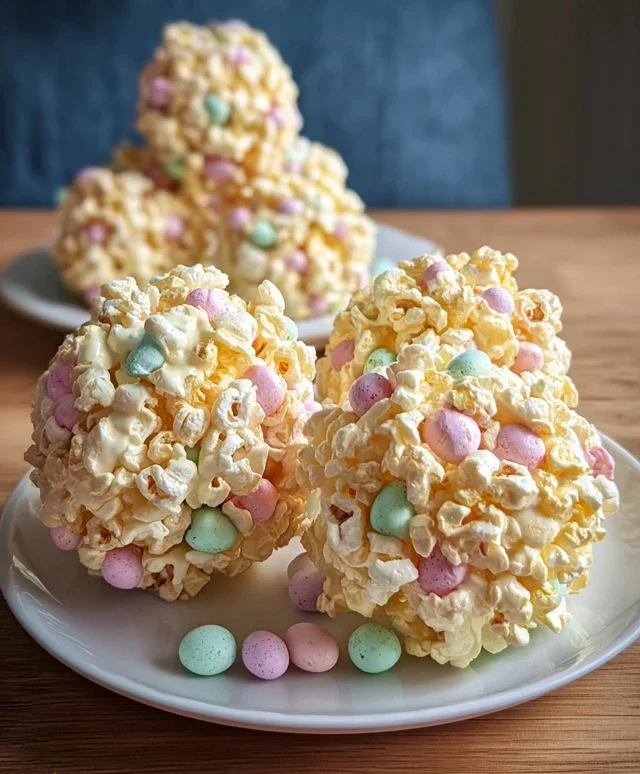
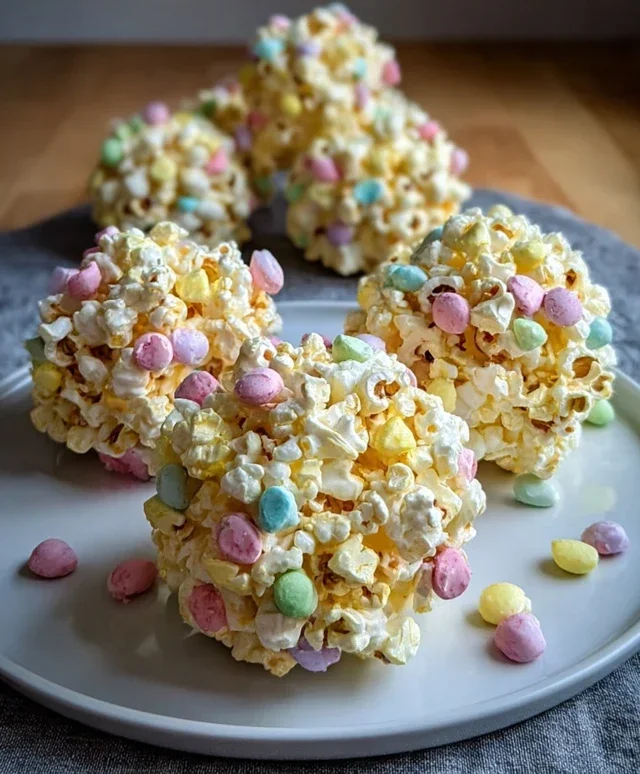
Easter popcorn balls are a delightful and surprisingly simple treat that perfectly captures the spirit of the season. These colorful, chewy, and delightfully sweet creations are a fantastic way to celebrate with family and friends, and they’re so easy to make that even the little ones can get involved in the fun. Forget the complicated baking projects; these popcorn balls offer pure, unadulterated joy in every bite. The vibrant colors from the Peeps and sprinkles make them a visually appealing centerpiece for any Easter gathering, and their portability makes them ideal for Easter egg hunts or care packages.
The magic of these popcorn balls lies in their irresistible texture – the satisfying crunch of popcorn giving way to the gooey, marshmallowy center. The addition of colorful Peeps not only adds a festive visual element but also contributes a subtle fruitiness and chegrape juicess that distinguishes them from your average popcorn ball. We’ll then elevate them further with shimmering edible glitter and a scattering of adorable mini Easter candies, ensuring each ball is a tiny masterpiece of holiday cheer.
Ingredients:
Making Your Easter Popcorn Balls
The process of creating these festive treats is straightforward and enjoyable. We’ll be working with melted marshmallows, which can be a bit sticky, so having a helper and preparing your workspace in advance is always a good idea. Remember, patience is key, especially when handling the warm mixture.
1. Prepare Your Popcorn and Peeps: First things first, ensure you have your 8 cups of popped popcorn ready to go. It’s best to pop it fresh or use store-bought popcorn that is as plain as possible to allow the flavors of the marshmallows and add-ins to shine. Next, take your 6 Peeps marshmallows and carefully cut them into small, bite-sized pieces. You can use kitchen scissors or a knife for this. Aim for pieces that are roughly the size of a pea or a small jelly bean. Different colors of Peeps will create a beautiful, confetti-like effect within your popcorn balls, so feel free to mix and match!
2. Melt the Marshmallow Base: In a large, heavy-bottomed pot or a microwave-safe bowl, combine the 3 tablespoons of unsalted butter and the 1 bag (10 ounces) of mini marshmallows. If you’re using a pot, melt the butter over low heat, then add the mini marshmallows. Stir constantly until the butter is melted and the marshmallows are smooth and completely melted. Be sure to keep the heat on low to prevent the marshmallows from scorching or hardening. If using a microwave, heat in 30-second intervals, stirring between each, until fully melted and smooth. This is your binding agent, so getting it perfectly smooth is important for cohesive popcorn balls. Once melted, stir in the 1 teaspoon of vanilla extract for a subtle boost of flavor that complements the sweetness of the marshmallows.
3. Combine the Ingredients: Now comes the exciting part! Add your popped popcorn to the pot with the melted marshmallow mixture. Gently fold the popcorn into the marshmallow until it’s evenly coated. It’s crucial to work relatively quickly here, as the marshmallow mixture will start to set as it cools. Once the popcorn is mostly coated, add the chopped Peeps pieces to the pot. Fold them in carefully, trying not to mash them too much. You want those little pockets of chewy Peeps goodness to remain distinct. The residual heat will help them soften slightly without completely melting into the marshmallow.
4. Shape the Popcorn Balls: This step requires a bit of caution and preparation. Lightly grease your hands with butter or cooking spray, or you can even use lightly buttered gloves. This will prevent the sticky marshmallow mixture from clingin extractg to your hands. Working in small batches, scoop about 1/2 cup of the popcorn mixture and gently shape it into a ball. Don’t pack them too tightly, as this can make them hard. Just aim for a firm, cohesive ball shape. If the mixture becomes too sticky or difficult to handle, you can briefly rewarm it on very low heat, but be careful not to over-melt the Peeps. You can also use a lightly greased measuring cup or an ice cream scoop to help form uniform balls.
5. Decorate Your Masterpieces: Once your popcorn balls are shaped, it’s time for the festive finishing touches! While the popcorn balls are still slightly warm and sticky, you can immediately start decorating. Roll them gently in Easter-themed sprinkles, pressing them lightly so they adhere. You can use a variety of colors and shapes for a vibrant look. Next, delicately sprinkle them with edible glitter for that extra touch of sparkle. Finally, press a few small Easter candies into the sides of the popcorn balls. These could be mini chocolate eggs, jelly beans, or any other tiny Easter-themed confections you have on hand. Place the decorated popcorn balls on a parchment-lined baking sheet or wax paper to cool completely.
Allow your Easter popcorn balls to cool and set for at least 30 minutes to an hour before serving. They can be individually wrapped in cellophane for Easter baskets or party favors. Enjoy this sweet, festive, and fun treat!
Conclusion:
I hope you’ve enjoyed learning how to make these delightful Easter Popcorn Balls! This recipe is truly fantastic because it’s incredibly easy to whip up, making it a perfect activity for families to enjoy together during the Easter season. The sweet, chewy, and crunchy combination is irresistible, and the festive colors and decorations truly capture the spirit of Easter. These popcorn balls are not just a treat; they’re a fun and memorable part of the celebration. Imagin extracte the joy on your loved ones’ faces as they bite into these homemade goodies! They are perfect for Easter baskets, classroom parties, or simply as a special dessert after your Easter feast. For serving suggestions, consider arrangin extractg them on a festive platter adorned with pastel-colored cellophane wrappers or small Easter-themed ribbons. You can also package them individually for easy gifting. Don’t be afraid to get creative with variations! Consider adding a drizzle of white chocolate, some sprinkles in Easter colors, or even a few mini chocolate eggs embedded into the popcorn balls before they set. You could also experiment with different flavor extracts like a hint of vanilla or even a touch of citrus. I wholeheartedly encourage you to give this Easter Popcorn Balls recipe a try. It’s a simple yet incredibly rewarding way to spread Easter cheer and create lasting memories.
Frequently Asked Questions:
Can I make these Easter Popcorn Balls ahead of time?
Absolutely! These popcorn balls can be made up to 2-3 days in advance. Store them in airtight containers at room temperature, ensuring they are completely cooled before packagin extractg to prevent them from becoming soggy. If you live in a very humid climate, you might want to wrap each ball individually in plastic wrap for extra protection.
How can I prevent the popcorn balls from sticking to my hands while forming them?
A little bit of cooking spray or a small amount of butter on your hands works wonders! Lightly grease your palms before shaping the popcorn mixture into balls. This will create a barrier and make the process much smoother and less sticky. You can reapply as needed, but a little goes a long way.
What are some kid-friendly decoration ideas for these popcorn balls?
The possibilities are endless! Once the popcorn balls are formed and slightly cooled, let the kids have fun decorating. Pastel-colored icing or melted chocolate can be drizzled over the top. Colorful sprinkles, edible glitter, mini jelly beans, or even small candy eggs are perfect for adding a festive touch. You could also try attaching candy eyes to create little popcorn ball characters.
Easter Popcorn Balls
Festive and sweet popcorn balls perfect for Easter celebrations, loaded with colorful marshmallows and fun decorations.
Ingredients
-
8 cups popped popcorn
-
6 Peeps marshmallows (any color/flavor), cut into small pieces
-
3 tablespoons unsalted butter
-
1 bag (10 ounces) mini marshmallows
-
1 teaspoon vanilla extract
-
Easter-themed sprinkles
-
Edible glitter
-
Small Easter candies
Instructions
-
Step 1
Lightly grease a baking sheet or line with parchment paper. -
Step 2
In a large microwave-safe bowl, combine the mini marshmallows and butter. Microwave on high for 1 minute, stir, then microwave in 30-second intervals, stirring between each, until completely melted and smooth. -
Step 3
Stir in the vanilla extract. -
Step 4
Add the popped popcorn and the cut Peeps marshmallows to the melted marshmallow mixture. Stir gently until everything is coated. -
Step 5
While the mixture is still warm and pliable, wet your hands with a little water or cooking spray to prevent sticking. Shape the mixture into 12 balls. -
Step 6
Immediately decorate the popcorn balls with Easter-themed sprinkles, edible glitter, and small Easter candies. Press gently to adhere. -
Step 7
Let the popcorn balls cool completely on the prepared baking sheet before serving or storing.
Important Information
Nutrition Facts (Per Serving)
It is important to consider this information as approximate and not to use it as definitive health advice.
Allergy Information
Please check ingredients for potential allergens and consult a health professional if in doubt.