Easy Strawberry Truffles-Delicious & Quick Dessert
Strawberry Truffles are more than just a sweet treat; they’re little bites of pure joy, perfect for any occasion that calls for a touch of elegance and undeniable flavor. Imagin extracte the vibrant sweetness of fresh strawberries, captured in a decadent, melt-in-your-mouth ganache, all enrobed in a delicate chocolate shell. It’s no wonder these delightful morsels are so beloved! The magic of strawberry truffles lies in their perfect balance: the bright, slightly tart fruit cutting through the rich, creamy chocolate. They’re incredibly versatile, making them ideal for gifting, impressing guests at a party, or simply as a special indulgence for yourself. What truly sets these homemade strawberry truffles apart is the personal touch, the satisfaction of creating something so beautiful and delicious from scratch. Get ready to experience a taste of pure bliss!
Strawberry Truffles
Get ready to delight your senses with these exquisite Strawberry Truffles. Imagin extracte biting into a smooth, creamy center bursting with the sweet, floral essence of strawberries, all encased in a delicate layer of white chocolate. These little gems are surprisingly easy to make and are perfect for impressing guests, gifting to loved ones, or simply treating yourself to something truly special. We’re going to transform a few simple ingredients into something utterly decadent.
Ingredients:
Cooking Instructions:
Let’s embark on this delicious journey! The process is straightforward, focusing on gentle melting and careful assembly to achieve that signature truffle texture and appearance.
Phase 1: Creating the Luscious Strawberry Ganache
The heart of our strawberry truffles is the ganache. This is where the magic happens, blending the richness of white chocolate with the vibrant flavor of strawberries.
1. Melting the White Chocolate and Butter: In a medium-sized, heatproof bowl, combine the 1 cup of white chocolate chips and the ¼ cup of unsalted butter. We want to melt these together gently to avoid scorching the delicate white chocolate. The best way to do this is using a double boiler method. Fill a saucepan with about an inch or two of water and bring it to a gentle simmer over medium-low heat. Place the heatproof bowl containing the chocolate and butter over the saucepan, ensuring the bottom of the bowl does not touch the simmering water. Stir the mixture continuously with a silicone spatula or wooden spoon. You’ll notice the butter starting to melt first, followed by the white chocolate chips. Continue stirring until both are completely melted and the mixture is smooth and glossy. This process usually takes about 5-7 minutes. Be patient; rushing this step can lead to grainy chocolate.
2. Incorporating the Cream and Extracts: Once the white chocolate and butter are fully melted and beautifully smooth, remove the bowl from the heat. It’s crucial to work off the heat now to prevent the cream from curdling or the chocolate from seizing. Gradually whisk in the 3 tablespoons of heavy whipping cream. Pour it in a slow, steady stream while whisking constantly. This will emulsify the mixture, creating a rich and creamy ganache. Continue whisking until the ganache is completely smooth and well combined. Next, add the flavorings. Stir in the ½ teaspoon of strawberry extract and the ¼ teaspoon of vanilla extract. These extracts are potent, so measuring accurately is key to achieving a balanced flavor. The vanilla extract will complement and enhance the strawberry flavor without overpowering it.
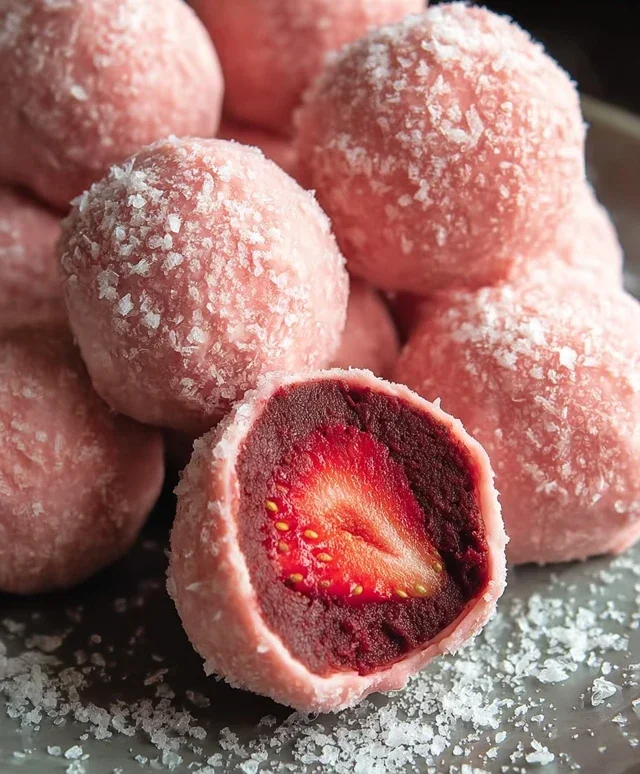
3. Achieving the Perfect Pink Hue: Now for a touch of visual appeal. Add 1 drop of pink food coloring to the ganache. It’s important to start with just one drop. White chocolate can be finicky with food coloring, and too much can alter the texture. Stir the food coloring in thoroughly until the ganache is a uniform, lovely pnon-alcoholic ale pink. If you desire a slightly deeper shade, you can add another tiny drop, but always err on the side of caution. The goal is a delicate, rosy hue that hints at the strawberry flavor within.
Phase 2: Chilling and Shaping the Truffles
Proper chilling is essential for making the ganache firm enough to handle and roll into balls.
4. Chilling the Ganache: Cover the bowl with plastic wrap, pressing the wrap directly onto the surface of the ganache to prevent a skin from forming. Place the bowl in the refrigerator and let it chill for at least 2 to 3 hours, or until the ganache is firm enough to scoop and roll. You’re looking for a consistency similar to firm peanut butter or cookie dough. If you’re in a hurry, you can speed up the process by placing the bowl in the freezer for about 30-45 minutes, checking it frequently to ensure it doesn’t get too hard. Once it’s firm, it’s time to get our hands a little messy!
Phase 3: Rolling and Coating
This is the final step where our truffles take their iconic form.
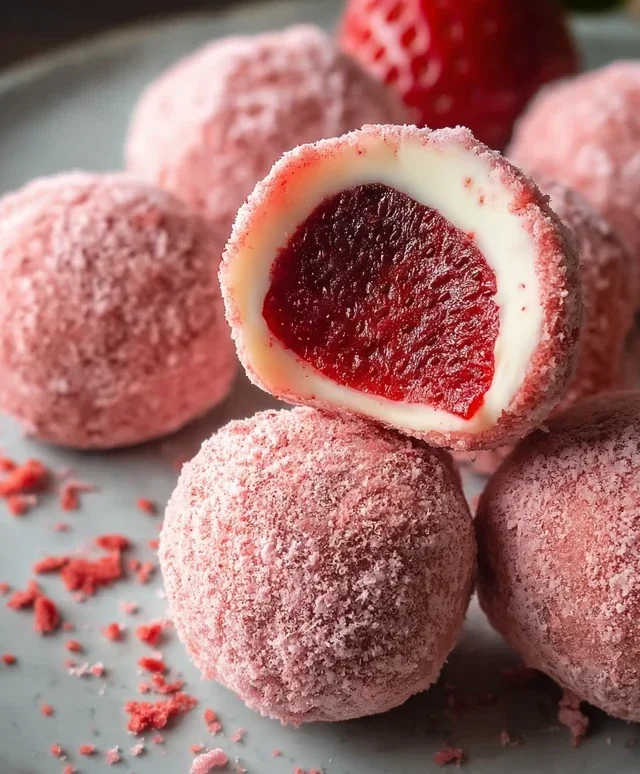
5. Rolling and Coating the Truffles: Once the ganache is well-chilled and firm, prepare a clean surface or a baking sheet lined with parchment paper for placing your rolled truffles. You may want to lightly dust your hands with a little powdered sugar to prevent sticking, but don’t use too much as it can affect the final texture. Using a small spoon or a melon baller, scoop out portions of the chilled ganache, about 1 to 1 ½ teaspoons in size. Gently roll each portion between your palms to form smooth, round balls. Don’t overwork the ganache; just a few gentle rolls are enough to create a uniform shape. As you roll each truffle, place it on the prepared baking sheet. Once all the ganache is rolled into balls, it’s time for the final touch. In a small bowl, combine the ¼ cup of powdered sugar. Gently roll each truffle in the powdered sugar until it is lightly and evenly coated. This powdered sugar coating gives the truffles a lovely matte finish and a hint of sweetness. For a more polished look, you can skip the powdered sugar and opt for a simple white chocolate drizzle or even some freeze-dried strawberry crum extractbles for garnish after they have chilled. However, the classic powdered sugar finish is wonderfully simple and delicious.
Your beautiful, homemade Strawberry Truffles are now ready to be enjoyed! For the best flavor and texture, I recommend letting them sit at room temperature for about 15-20 minutes before serving, allowing the ganache to soften slightly. They can be stored in an airtight container in the refrigerator for up to a week, but they are truly best when enjoyed fresh. Enjoy every single bite of these delightful sweet treats!
Conclusion:
I hope you’ve enjoyed exploring the delightful world of strawberry truffles! This recipe is truly a winner because it’s surprisingly simple to make, yet yields incredibly elegant and decadent treats. The combination of fresh strawberry sweetness with rich, creamy chocolate is simply irresistible, making these strawberry truffles perfect for any occasion. Whether you’re a seasoned baker or just starting out, you’ll find this recipe to be forgiving and rewarding. They make for a stunning dessert to share at parties, a thoughtful homemade gift, or just a delightful indulgence for yourself.
For serving suggestions, consider arrangin extractg them on a pretty platter with a few fresh mint leaves or alongside a glass of sparkling grape juice. They are also wonderful paired with a scoop of vanilla bean ice cream. If you’re feeling adventurous, try variations like adding a hint of lemon zest to the filling, rolling them in chopped pistachios for a beautiful green contrast, or drizzling them with a contrasting white chocolate. Don’t be afraid to experiment and make them your own!
I truly encourage you to give these strawberry truffles a try. You’ll be amazed at how quickly you can create something so special. Happy truffle-making!
Frequently Asked Questions about Strawberry Truffles:
Can I make these strawberry truffles ahead of time?
Absolutely! Strawberry truffles are ideal for making in advance. Once cooled and set, you can store them in an airtight container in the refrigerator for up to a week. Allow them to sit at room temperature for about 15-20 minutes before serving for the best texture.
What kind of chocolate is best for these truffles?
For the best flavor and texture, I recommend using good quality white chocolate or milk chocolate for the coating. For the filling, a good quality white chocolate will allow the strawberry flavor to shine through. You can also experiment with dark chocolate if you prefer a more intense chocolate flavor profile, but ensure it’s a good melting chocolate.
Strawberry Truffles
Delightful and easy-to-make strawberry-flavored white chocolate truffles.
Ingredients
-
1 cup white chocolate chips
-
1/4 cup unsalted butter
-
3 tablespoons heavy whipping cream
-
1/2 teaspoon strawberry extract
-
1/4 teaspoon vanilla extract
-
1 drop pink food coloring
-
1/4 cup powdered sugar
Instructions
-
Step 1
Melt white chocolate chips and butter together in a double boiler or microwave in short intervals, stirring until smooth. -
Step 2
Stir in heavy whipping cream until fully combined. -
Step 3
Add strawberry extract, vanilla extract, and pink food coloring. Stir until the color is uniform. -
Step 4
Pour the mixture into a shallow dish and refrigerate for at least 1 hour, or until firm enough to roll. -
Step 5
Scoop small portions of the mixture and roll them into balls. You can use a small cookie scoop or a spoon. -
Step 6
Roll the truffle balls in powdered sugar until evenly coated. -
Step 7
Place truffles on a parchment-lined plate and refrigerate for at least 30 minutes before serving to allow them to set.
Important Information
Nutrition Facts (Per Serving)
It is important to consider this information as approximate and not to use it as definitive health advice.
Allergy Information
Please check ingredients for potential allergens and consult a health professional if in doubt.