Easy Oreo Milkshake Recipe- The Ultimate Treat
Oreo Milkshake: the ultimate sweet escape, the creamy, dreamy treat that instantly transports you back to childhood bliss. Who can resist the allure of crushed Oreo cookies blended into a velvety smooth ice cream base? It’s more than just a drink; it’s a nostalgic hug in a glass. The satisfying crunch of cookie bits against the cool, luscious milkshake is pure magic, a texture and flavor combination that’s simply irresistible. What makes this beloved dessert so special is its perfect balance: the rich, decadent chocolate of the ice cream harmonizing beautifully with the distinct, slightly bitter sweetness of the Oreos. It’s a simple yet profound pleasure, a guaranteed mood-booster that’s surprisingly easy to whip up at home. Get ready to dive into this delightful Oreo Milkshake recipe and create your own moment of pure joy.
Oreo Milkshake
There’s something utterly comforting and utterly decadent about a thick, creamy, and chocolatey Oreo milkshake. It’s a classic for a reason, a treat that instantly transports you back to simpler times, or perhaps just a delicious escape from the everyday. Whether you’re craving a sweet indulgence after a long day, looking for a fun dessert to make with the kids, or simply a connoisseur of all things chocolatey, this Oreo milkshake recipe is your golden ticket to happiness. Forget those watery, bland versions; we’re talking about a truly spectacular, intensely flavored, and wonderfully thick milkshake that will have you licking the spoon (and maybe even the blender jar!).
This recipe is incredibly simple to whip up, requiring just a handful of readily available ingredients. The magic lies in the perfect ratio of creamy ice cream, rich milk, and of course, those iconic chocolate sandwich cookies. We’re going to break down how to achieve that perfect texture and flavor, ensuring every sip is a delightful experience. So, grab your blender and let’s get started on creating this ultimate Oreo indulgence.
Ingredients:
Crafting the Perfect Oreo Milkshake
The beauty of this recipe is its straightforward nature. It’s designed to be foolproof, allowing even the most novice of kitchen adventurers to create a restaurant-worthy treat. The key to a truly exceptional milkshake lies in the quality of your ingredients and the precise blending technique. We’re aiming for a milkshake that is thick enough to hold its shape, yet smooth and drinkable. Let’s dive into the detailed steps to achieve this delightful concoction.
Step 1: Preparing the Stars of the Show – The Oreos
Before we even think about the blender, let’s get our Oreo cookies ready. The number of cookies you use will directly impact the intensity of the Oreo flavor and the color of your milkshake. For a classic, well-balanced flavor, I find 15 to be a good starting point. If you’re an extreme Oreo lover, feel free to bump it up to 20 or even more! Now, for the preparation: you have a couple of options. You can either break the cookies into smaller chunks by hand, which will result in slightly larger cookie pieces throughout your milkshake, adding a delightful textural contrast. Alternatively, you can place the cookies in a resealable plastic bag and gently crush them with a rolling pin or the bottom of a sturdy glass. This will create finer crum extractbs and a more integrated cookie flavor. For an extra decadent touch, reserve a few whole Oreos or some crushed crum extractbs for garnishing your finished masterpiece.
Step 2: The Foundation – Ice Cream and Milk
This is where the creamy base of our milkshake is formed. For the best results, ensure your vanilla ice cream is slightly softened, but not completely melted. This will make it easier for your blender to handle and will contribute to a thicker, more luscious texture. Scoop the softened ice cream directly into your blender jar. Next, add the milk. While you can use any milk, I highly recommend using whole milk. Its higher fat content contributes significantly to the richness and creaminess of the milkshake, making it taste more luxurious. Skim milk or 2% milk will work, but your milkshake might be a bit thinner. If you’re using the optional vanilla extract, now’s the time to add it. A little goes a long way to amplify the vanilla notes and complement the chocolate of the Oreos.
Step 3: The Blending Process – Achieving Perfect Consistency
Now for the magic to happen! Secure the lid on your blender. Start by blending on a low speed for a few seconds to break down the ice cream and incorporate the ingredients. Then, gradually increase the speed to medium-high. Blend until the mixture is smooth and creamy. The key here is to avoid over-blending, which can melt the ice cream too much and result in a runny milkshake. You want to blend just long enough for all the ingredients to be fully combined and for the mixture to reach your desired consistency. If your blender has a pulse function, you can use that to help break up larger chunks of cookie without over-processing. If the milkshake seems too thick for your liking, you can add a tablespoon or two more milk at a time, blending briefly after each addition until you reach your desired pourable consistency. Conversely, if it seems too thin, you can add a little more ice cream and blend again.
Step 4: Incorporating the Oreo Goodness
Once your ice cream and milk base is smooth, it’s time to add the prepared Oreo cookies. If you chose to crush them into crum extractbs, add them all at once. If you broke them into larger chunks, add them now. Blend on a medium speed for a short burst, just enough to break down the cookies and distribute them throughout the milkshake. You don’t want to over-blend at this stage, as you might end up with a completely uniform, brown color and lose those delightful flecks of cookie. We’re aiming for visible pieces of cookie for both texture and visual appeal. Blend just until the cookies are incorporated and the milkshake has a beautiful, speckled appearance. This usually only takes about 15-30 seconds.
Step 5: Serving Your Masterpiece
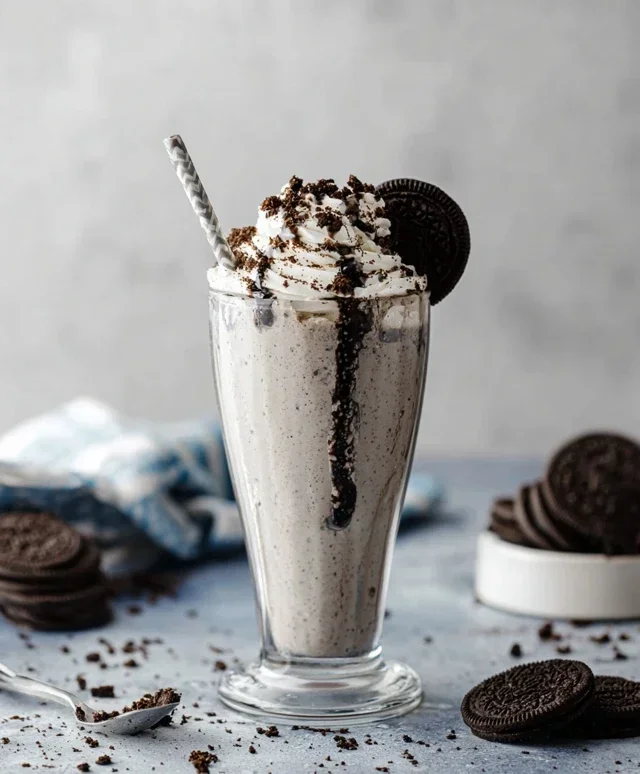
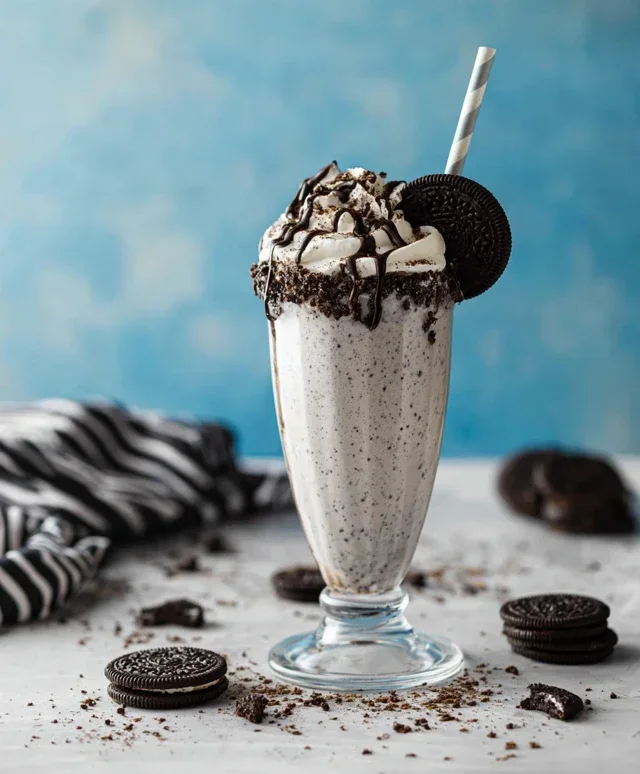
Pour your thick and delicious Oreo milkshake into chilled glasses. For an extra special presentation, you can rim your glasses with crushed Oreo cookies. To do this, wet the rim of the glass with a little water or a dab of frosting, then dip it into a plate of finely crushed Oreo cookies. Fill your glasses generously. If you like a truly over-the-top treat, crown your milkshake with a generous dollop of whipped cream. For the final flourish, sprinkle some additional crushed Oreo cookies over the whipped cream. Serve immediately with a wide straw and perhaps even a spoon, as this milkshake is thick enough to warrant one! Enjoy the rich, chocolatey goodness with every single sip.
Conclusion:
There you have it – a simple yet incredibly satisfying recipe for the ultimate Oreo Milkshake! This recipe truly shines because it delivers that perfect balance of creamy, sweet, and chocolatey goodness with minimal effort. Whether you’re looking for a quick treat, a fun dessert for guests, or just a way to indulge your sweet tooth, this Oreo Milkshake is a guaranteed winner. It’s incredibly versatile, making it perfect for any occasion.
For serving, I love to pour it into a tall, chilled glass and top it with a generous swirl of whipped cream and a few extra Oreo crum extractbles. A chocolate drizzle never goes amiss either! If you’re feeling adventurous, consider some fun variations. Add a scoop of your favorite ice cream for an even richer shake, or blend in a shot of espresso for a delightful coffee kick. You could even add a splash of chocolate syrup or a few chopped chocolate chips for an extra layer of indulgence. Don’t be afraid to experiment and make this recipe your own!
I truly hope you give this delicious Oreo Milkshake recipe a try. It’s a classic for a reason, and I’m confident you’ll love every sip!
Frequently Asked Questions:
Can I make this vegan?
Absolutely! To make a vegan Oreo Milkshake, simply swap out the dairy milk for your favorite plant-based milk (almond, soy, or oat milk work wonderfully) and use vegan ice cream. Many Oreo cookies are also accidentally vegan, so be sure to check the packagin extractg!
What if I don’t have an ice cream maker?
No worries at all! This recipe is designed to be made without an ice cream maker. The combination of frozen milk (or ice cream) and crushed Oreos creates the perfect thick and creamy texture. Just ensure your milk is frozen solid for the best results.
How can I make my milkshake thicker?
To achieve a thicker milkshake, you can reduce the amount of milk slightly, use more ice cream, or add a few ice cubes. Freezing your milk beforehand in an ice cube tray can also significantly contribute to a thicker consistency.
Oreo Milkshake
A classic and delicious Oreo milkshake, perfect for a sweet treat.
Ingredients
-
2 cups vanilla ice cream
-
1/2 cup milk
-
6 Oreo cookies, crushed
-
1 tablespoon sugar
-
Whipped cream (for topping)
-
Chocolate syrup (for drizzling)
Instructions
-
Step 1
Place the vanilla ice cream into a blender. -
Step 2
Pour in the milk. -
Step 3
Add the crushed Oreo cookies and sugar to the blender. -
Step 4
Blend on high speed until smooth and creamy. If it’s too thick, add a splash more milk. -
Step 5
Pour the milkshake into a tall glass. -
Step 6
Top with whipped cream and drizzle with chocolate syrup, if desired.
Important Information
Nutrition Facts (Per Serving)
It is important to consider this information as approximate and not to use it as definitive health advice.
Allergy Information
Please check ingredients for potential allergens and consult a health professional if in doubt.