Biscoff Cookie Butter Cheesecake Pops Deliciously Creamy
Biscoff Cookie Butter Cheesecake Pops are an absolute dream come true for anyone who adores that irresistible spiced cookie flavor. If you’ve ever found yourself scooping spoonfuls of Biscoff cookie butter straight from the jar, then prepare yourself for pure bliss! These delightful pops take that beloved spread and transform it into a creamy, dreamy cheesecake experience, all bundled up in a perfectly portioned, handheld treat. What makes them truly special is the magical synergy between the tangy, rich cheesecake and the warm, spiced notes of Biscoff. It’s a flavor combination that’s undeniably addictive and guaranteed to bring smiles to everyone’s faces, whether you’re serving them at a party or just treating yourself. Get ready to elevate your dessert game with these utterly irresistible Biscoff Cookie Butter Cheesecake Pops.

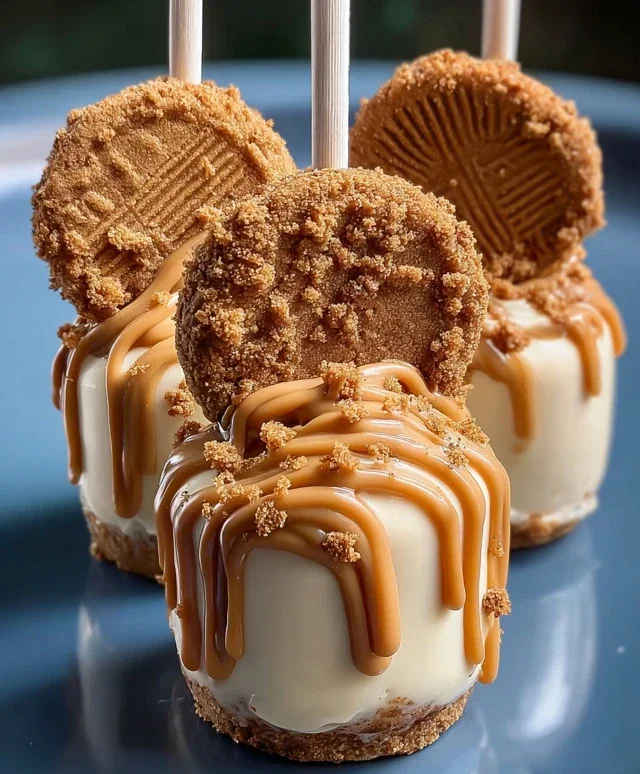
Biscoff Cookie Butter Cheesecake Pops
Get ready to embark on a truly delightful dessert adventure! These Biscoff Cookie Butter Cheesecake Pops are an absolute showstopper, combining the creamy, dreamy indulgence of cheesecake with the irresistible spiced caramel flavor of Biscoff cookies and cookie butter. They’re perfect for parties, a special treat, or simply when you’re craving something utterly delicious. The best part? They’re surprisingly easy to make and incredibly fun to eat! Forget boring old cheesecake; these pops are a playful twist that will have everyone asking for the recipe.
Ingredients:
Instructions:
1. Preparing the Cheesecake Base: The foundation of our delicious pops is a smooth, creamy cheesecake mixture. Start by ensuring your cream cheese is truly softened. This is crucial for achieving a lump-free batter. Leave it on the counter for at least an hour, or gently warm it in the microwave for short intervals (about 15 seconds at a time), stirring in between, until it’s pliable. In a medium-sized bowl, beat the softened cream cheese with an electric mixer until it’s light and fluffy. Gradually add the powdered sugar, continuing to beat until well combined and no sugar granules remain. Next, incorporate the vanilla extract and beat until just combined. This creates our sweet and fragrant cheesecake base.
2. Incorporating the Biscoff Magic: Now comes the star ingredient – the Biscoff cookie butter! Add the ½ cup of Biscoff cookie butter to the cream cheese mixture. Beat on low speed until it’s thoroughly blended. The mixture will take on a beautiful beige hue and a wonderfully rich aroma. Gently fold in the ½ cup of crushed Biscoff cookies. Don’t overmix at this stage; we want to maintain some texture from the cookie crum extractbs, which will add a delightful crunch to our pops. If you want a slightly smoother consistency for the cheesecake filling, you can add the optional 2 tablespoons of heavy cream here and mix until just incorporated. This step is entirely personal preference and depends on how thick you like your cheesecake filling.
3. Adding the Airy Whipped Cream: To give our cheesecake pops that signature light and airy texture, we’ll gently fold in the whipped cream or Cool Whip. If you’re using fresh whipped cream, make sure it’s stiffly whipped so it doesn’t deflate the cheesecake mixture. Add the ½ cup of whipped cream to the bowl and use a spatula to gently fold it in. Be careful not to overmix; we want to keep as much air in the mixture as possible. This step transforms the dense cream cheese base into a light and luscious filling that will be perfect for our pops.
4. Assembling the Cheesecake Pops: This is where the fun really begin extracts! You have a couple of options for assembling these delightful treats. The easiest method is to use a mini muffin tin or small silicone molds. Line the tin or molds with paper liners or use silicone ones that are already shaped. Carefully spoon the cheesecake mixture into each liner or mold, filling them about ¾ of the way full. If you’re using a standard mini muffin tin without liners, you can lightly grease and flour them. Once filled, insert a popsicle stick into the center of each pop, pushing it down gently until it reaches the bottom. If you’re short on time or don’t have molds, you can also line a small, square baking dish with parchment paper, spread the mixture evenly, and then cut it into squares or rectangles once frozen. For the most classic pop shape, I find using silicone molds designed for cake pops or even just small paper cups works wonderfully. Just be sure to allow for enough time for them to firm up.
5. Chilling and Finishing Touches: Once your pops are assembled in their molds or baking dish, it’s time to let them chill and firm up. Place the tray in the freezer for at least 4-6 hours, or until the cheesecake pops are completely solid. This is a crucial step to ensure they hold their shape when you remove them from the molds and dip them. Once frozen solid, carefully remove the cheesecake pops from their molds. If you used a baking dish, cut the firm cheesecake into squares or rectangles and insert the popsicle sticks. Now for the final flourish: we’re going to dip them! You can melt some extra Biscoff cookie butter with a touch of vegetable oil or coconut oil to create a dipping glaze, or even use melted white or dark chocolate for a contrasting flavor. Dip each frozen pop into the melted glaze, letting any excess drip off. Immediately sprinkle with extra crushed Biscoff cookies while the glaze is still wet. You can also press whole Biscoff cookies onto the sides for an extra decorative touch. Place the finished pops back on a parchment-lined baking sheet and return them to the freezer for another 30 minutes to an hour to allow the outer coating to set.
These Biscoff Cookie Butter Cheesecake Pops are a truly magical dessert experience. The combination of creamy, spiced, and crunchy elements is simply divine. Enjoy them straight from the freezer for a delightful cool treat!
Conclusion:
There you have it – a delightful recipe for Biscoff Cookie Butter Cheesecake Pops that’s sure to impress! This recipe is truly wonderful because it combines the irresistible creaminess of cheesecake with the unique, spiced sweetness of Biscoff cookie butter, all in a perfectly portioned, fun-to-eat pop. They are surprisingly simple to make, making them an ideal project for bakers of all levels. Whether you’re hosting a party, looking for a unique dessert for a bake snon-alcoholic ale, or simply craving a special treat, these pops deliver a flavor explosion that will have everyone asking for seconds.
I love serving these as a festive dessert after dinner, or even as a sweet accompaniment to coffee or tea. They are also fantastic for birthdays, holidays, or any occasion that calls for a touch of indulgence. Don’t be afraid to get creative with variations! You could swirl in some melted Biscoff cookies, top them with crushed Biscoff cookies, or even add a drizzle of white chocolate for an extra layer of flavor and visual appeal. I truly encourage you to give this Biscoff Cookie Butter Cheesecake Pops recipe a try – I’m confident you’ll adore them as much as I do!
Frequently Asked Questions:
Can I make these cheesecake pops ahead of time?
Absolutely! These Biscoff Cookie Butter Cheesecake Pops are perfect for making ahead. You can prepare them up to 2-3 days in advance and store them in an airtight container in the refrigerator. This makes them an excellent option for party planning, allowing you to focus on other preparations closer to the event.
What happens if I don’t have cookie butter? Can I substitute it?
While the star of this recipe is Biscoff cookie butter, you can experiment with other smooth cookie butters if Biscoff isn’t readily available. However, the unique spiced flavor of Biscoff is what truly elevates these pops. You could also try using a finely crushed speculoos cookie mixed with a little cream cheese and a touch of sugar to mimic the texture and flavor, but it won’t be quite the same!
Biscoff Cookie Butter Cheesecake Pops
Decadent no-bake cheesecake pops infused with the irresistible flavor of Biscoff cookies and cookie butter, perfect for a sweet treat.
Ingredients
-
8 oz cream cheese, softened
-
1/2 cup powdered sugar
-
1 teaspoon vanilla extract
-
1/2 cup whipped cream (or Cool Whip)
-
1/2 cup crushed Biscoff cookies
-
1/2 cup Biscoff cookie butter
-
2 tablespoons heavy cream (optional, for thinning)
-
Whole Biscoff cookies
-
Extra crushed Biscoff cookies for garnish
-
Popsicle sticks
Instructions
-
Step 1
In a large bowl, beat together the softened cream cheese and powdered sugar until smooth and creamy. -
Step 2
Stir in the vanilla extract and Biscoff cookie butter until well combined. -
Step 3
Gently fold in the whipped cream (or Cool Whip) and crushed Biscoff cookies until just incorporated. -
Step 4
If the mixture is too thick, stir in the heavy cream, 1 tablespoon at a time, until it reaches a pipeable consistency. -
Step 5
Line a baking sheet with parchment paper. Spoon or pipe the cheesecake mixture into small balls or desired shapes. Insert a popsicle stick into each one. -
Step 6
Place a whole Biscoff cookie on either side of each cheesecake pop, pressing gently to adhere. Decorate with extra crushed Biscoff cookies. -
Step 7
Freeze for at least 2-3 hours, or until firm. Serve directly from the freezer.
Important Information
Nutrition Facts (Per Serving)
It is important to consider this information as approximate and not to use it as definitive health advice.
Allergy Information
Please check ingredients for potential allergens and consult a health professional if in doubt.