Easy Scones Recipe-Perfect Fluffy Treats
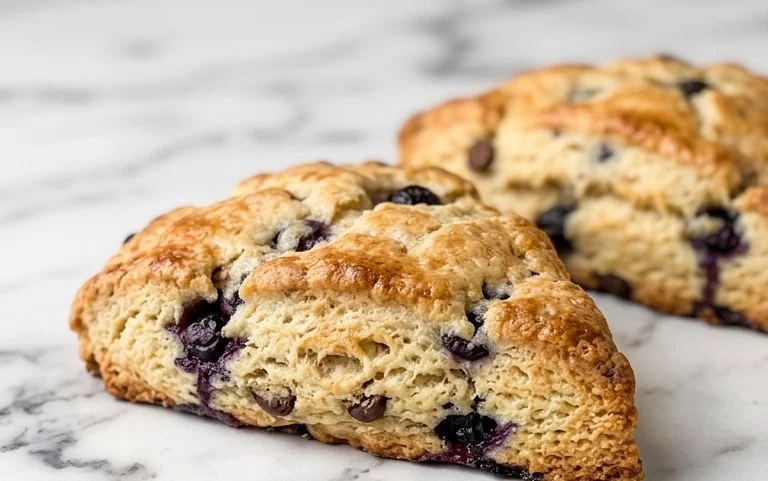
Scones Recipe: the very mention of this classic bake conjures images of cozy afternoons, steaming cups of tea, and that irresistible, slightly crum extractbly texture. But what is it about scones that makes them so universally adored? It’s that perfect balance of simplicity and indulgence. A good scone recipe delivers a light, airy interior with a tender crum extractb, kissed by a golden-brown exterior that promises a satisfying bite. Whether you’re a seasoned baker or just starting out, mastering the art of the scone is a rewarding journey. They are the ultimate blank canvas, ready to be elevated with sweet jams, clotted cream, or even savory additions. The magic of a homemade scone lies in its versatility and its ability to evoke a sense of comfort and tradition. I’m so excited to share my go-to scones recipe with you, one that guarantees delightful results every time.
Simple & Delicious Scones Recipe
There’s something incredibly satisfying about a warm, flaky scone, fresh from the oven. Whether you enjoy them with a dollop of clotted cream and jam for a classic afternoon tea, or simply slathered with butter, these homemade scones are sure to become a staple in your baking repertoire. This recipe is wonderfully versatile, allowing you to customize your scones with a variety of delicious mix-ins. We’ll walk through the process step-by-step, ensuring even begin extractner bakers can achieve scone perfection.
Ingredients:
Getting Started: Preparation is Key
Before we even think about mixing, let’s ensure all our ingredients are prepped. The key to tender, flaky scones is cold butter and cold cream. This is because when the cold butter hits the hot oven, it melts, creating steam that separates the layers of dough, resulting in that delightful flakiness. So, make sure your butter is well chilled and cut into small cubes. It’s even a good idea to pop your bowl of heavy cream into the freezer for about 15-20 minutes before you start. This will help maintain its cold temperature throughout the mixing process.
Creating the Dough
1. In a large bowl, whisk together the all-purpose flour, granulated sugar, baking powder, and salt. This dry mixture forms the base of our scones. Make sure to distribute the sugar and leavening agents evenly to ensure consistent rise and sweetness throughout.
2. Add the cold, cubed unsalted butter to the flour mixture. Using your fingertips, a pastry blender, or a food processor (pulsing briefly), cut the butter into the flour until the mixture resembles coarse crum extractbs with some pea-sized pieces of butter still visible. Don’t overmix at this stage; the pockets of butter are crucial for flakiness. You want a texture that looks like wet sand with some small butter chunks.
Incorporating Wet Ingredients and Mix-ins
3. In a separate small bowl, whisk together the ½ cup plus 1 tablespoon of very cold heavy cream and the lightly beaten large egg. Make a well in the center of your dry ingredients and pour in the wet mixture. Gently stir with a fork or spatula until just combined. The dough will be shaggy and a little sticky. Be careful not to overmix, as this can lead to tough scones. Overworking the gluten in the flour is the enemy of tenderness.
4. If you are adding mix-ins, gently fold them into the dough now. Whether you’re using fresh berries, chocolate chips, or dried fruit, incorporate them just enough to distribute them throughout the dough. If using fresh berries, be gentle to avoid crushing them too much, which can release excess moisture and make the dough wetter.
Shaping and Baking Your Scones
5. Turn the dough out onto a lightly floured surface. Gently knead the dough just a few times (about 5-6 turns) to bring it together. Do not over-knead. Pat the dough into a round disc about ¾ to 1 inch thick. You can either cut this disc into 6-8 wedges using a sharp knife, or use a round biscuit cutter to create individual scones. If using a cutter, press straight down without twisting to ensure clean edges that will rise evenly. Re-gather and gently pat any scraps to cut out additional scones, but try to do this quickly to keep the dough cool.
6. Place the shaped scones onto a baking sheet lined with parchment paper. Brush the tops of the scones with a little extra heavy cream. This will give them a beautiful golden-brown sheen as they bake and helps the optional sugar topping adhere. If you like a little sparkle, you can sprinkle a little granulated sugar over the tops before baking.
7. Bake in a preheated oven at 400°F (200°C) for 18-22 minutes, or until the scones are golden brown and a toothpick inserted into the center comes out clean. The exact baking time will depend on your oven and the size of your scones. Rotate the baking sheet halfway through baking for even browning.
Once baked, let the scones cool on the baking sheet for a few minutes before transferring them to a wire rack to cool completely. They are best enjoyed warm, but they also store well in an airtight container at room temperature for a couple of days. Enjoy your homemade scones with your favorite accompaniments!

Conclusion:
And there you have it – your guide to creating perfect scones! I truly believe this recipe is fantastic because it’s straightforward, uses readily available ingredients, and consistently delivers delightfully tender and flaky results. These scones are wonderfully versatile, making them the perfect canvas for so many delicious toppings and accompaniments. Whether you’re enjoying a leisurely brunch, a cozy afternoon tea, or a simple treat with your morning coffee, these scones are sure to impress. Don’t be afraid to experiment with variations like adding a handful of fresh berries, chocolate chips, or even a sprinkle of cinnamon for a touch of warmth.
I wholeheartedly encourage you to give this scones recipe a try. You’ll be amazed at how easy it is to bake these delightful treats from scratch. They’re best served warm, straight from the oven, with a generous dollop of clotted cream and your favorite jam. Imagin extracte the aroma filling your kitchen – it’s pure baking bliss!
Frequently Asked Questions:
Q: My scones are tough. What did I do wrong?
A: Tough scones often result from overmixing the dough or overworking it. Once you add the liquid ingredients, mix just until everything is combined and a shaggy dough forms. Avoid kneading the dough extensively.
Q: Can I make this scone recipe ahead of time?
A: While scones are best enjoyed fresh, you can prepare the dough a day in advance and store it, covered, in the refrigerator. You might need to let it sit at room temperature for about 10-15 minutes before baking, and the baking time may be slightly longer.
Q: What’s the best way to store leftover scones?
A: Once completely cooled, store leftover scones in an airtight container at room temperature for up to 2 days. To reheat, a few minutes in a moderate oven or a quick zap in the microwave will help restore some of their origin extractal texture.
Classic Scones Recipe
A simple and versatile recipe for delicious homemade scones, perfect for breakfast or tea time. Customize with your favorite mix-ins.
Ingredients
-
6 tablespoons unsalted butter, cold and cubed
-
2 cups all-purpose flour
-
⅓ cup granulated sugar
-
1 tablespoon baking powder
-
½ teaspoon salt
-
½ cup plus 1 tablespoon heavy cream, chilled
-
1 large egg, lightly beaten
-
up to 1 cup total mix-ins, as desired (e.g., fresh blueberries, mini chocolate chips, dried cranberries)
Instructions
-
Step 1
Preheat oven to 400°F (200°C). Line a baking sheet with parchment paper. -
Step 2
In a large bowl, whisk together the all-purpose flour, granulated sugar, baking powder, and salt. -
Step 3
Cut in the cold, cubed unsalted butter using a pastry blender or your fingertips until the mixture resembles coarse crumbs with some pea-sized pieces of butter remaining. -
Step 4
In a small bowl, whisk together the ½ cup plus 1 tablespoon heavy cream and the lightly beaten large egg. -
Step 5
Pour the wet ingredients into the dry ingredients and stir with a fork until just combined. Do not overmix. Gently fold in your desired mix-ins. -
Step 6
Turn the dough out onto a lightly floured surface. Gently pat it into a disk about ¾ inch thick. Cut into 8 wedges using a knife or bench scraper. -
Step 7
Place the scones onto the prepared baking sheet. Brush the tops with a little extra heavy cream for a golden finish. -
Step 8
Bake for 18-20 minutes, or until golden brown and cooked through.
Important Information
Nutrition Facts (Per Serving)
It is important to consider this information as approximate and not to use it as definitive health advice.
Allergy Information
Please check ingredients for potential allergens and consult a health professional if in doubt.