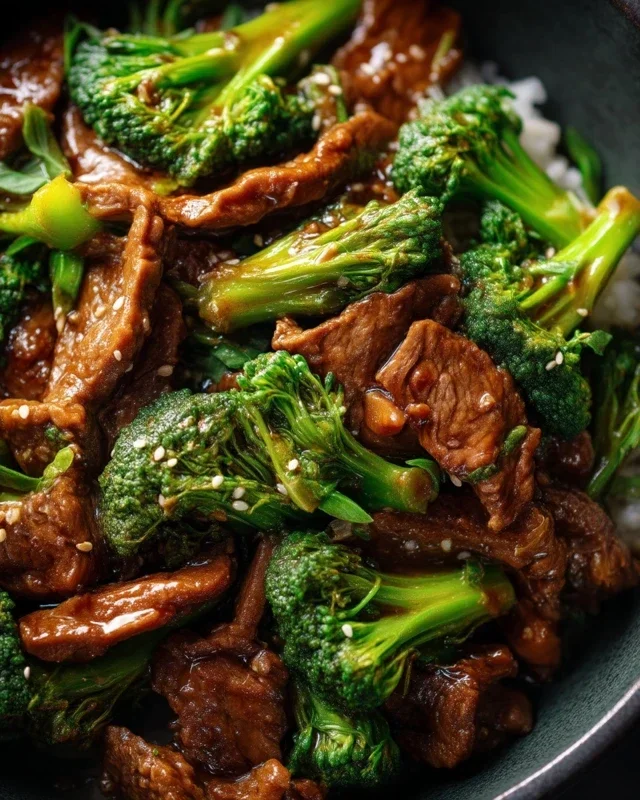
Easy Honey Garlic Chicken Quick Meal
Easy 20-min. Honey Garlic Chicken is a weeknight dinner superhero, and for good reason! This dish isn’t just fast; it’s an explosion of sweet, savory, and garlicky goodness that consistently wins over even the pickiest eaters. We all crave those meals that deliver maximum flavor with minimal effort, and this honey garlic chicken recipe is the ultimate solution. What sets this particular version apart is its perfect balance – the honey offers a delightful sweetness that beautifully complements the pungent kick of garlic, all coming together in a glossy, irresistible sauce. It’s the kind of meal that makes you feel like a culinary rockstar, even if you only have twenty minutes to spare. Get ready to impress yourself and everyone at your table with this incredibly satisfying and incredibly quick meal.

Ingredients:
- 4 skin-on bone-in chicken thighs (or substitute with boneless skinless thighs)
- 2 teaspoons vegetable oil (or any neutral oil like canola or grapeseed oil)
- 1/2 teaspoon salt
- 1/4 teaspoon black pepper
- 3/4 teaspoon garlic powder
- 5 cloves garlic, minced
- 1/4 cup honey (or maple syrup, brown sugar, or light corn syrup if you have a honey allergy)
- 3 tablespoons cold water
- 1 tablespoon rice vinegar (or white vinegar or apple cider vinegar)
- 1/2 tablespoon regular soy sauce
- 2 teaspoons sesame oil
- 1 teaspoon cornstarch (or potato starch or tapioca starch)
Prepare the Chicken
Seasoning the Thighs
Let’s get started by preparing our chicken. If you’re using skin-on, bone-in thighs, I highly recommend patting them thoroughly dry with paper towels. This is a crucial step for achieving that wonderfully crispy skin we all love. Once dry, place the chicken thighs in a medium bowl. Sprinkle them evenly with the 1/2 teaspoon of salt, 1/4 teaspoon of black pepper, and the 3/4 teaspoon of garlic powder. Gently toss the chicken to ensure each piece is well-coated with the seasonings. This simple seasoning will lay the foundation for fantastic flavor.
Cooking the Chicken
Searing for Crispy Skin
Now, heat the 2 teaspoons of vegetable oil in a large, oven-safe skillet (cast iron is excellent for this) over medium-high heat. You want the oil to be shimmering but not smoking. Carefully place the seasoned chicken thighs into the hot skillet, skin-side down. Be mindful of splattering oil. Let the chicken sear undisturbed for about 5-7 minutes. Resist the urge to move them around! This extended searing time is key to rendering the fat from the skin and achieving that desirable golden-brown crispness. If you’re using boneless, skinless thighs, sear for about 3-4 minutes per side until golden brown.
Finishing in the Oven (Optional but Recommended)
Once the skin-side has developed a beautiful crisp, carefully flip the chicken thighs over. If your skillet is oven-safe, transfer the entire skillet to a preheated oven at 400°F (200°C). Bake for about 15-20 minutes, or until the chicken is cooked through and reaches an internal temperature of 165°F (74°C). The exact time will depend on the size of your chicken thighs. If your skillet isn’t oven-safe, you can transfer the seared chicken to a baking sheet before placing it in the oven. This step ensures the chicken is cooked through without overcooking the exterior.
Making the Honey Garlic Sauce
Building the Flavor Base
While the chicken is finishing, let’s whip up our easy honey garlic sauce. In a small bowl, whisk together the 1/4 cup of honey, 3 tablespoons of cold water, 1 tablespoon of rice vinegar, and the 1/2 tablespoon of soy sauce. Make sure these ingredients are well combined. In a separate tiny bowl, whisk together the 1 teaspoon of cornstarch with the 2 teaspoons of sesame oil. This slurry will help thicken our sauce beautifully and add that lovely nutty aroma of sesame. It’s important to mix the cornstarch with the oil before adding it to the wet ingredients to prevent lumps.
Simmering and Thickening
Once the chicken is cooked and you’ve removed it from the skillet (set it aside to rest while you finish the sauce), pour the prepared honey-garlic liquid mixture directly into the same skillet. Place the skillet back on the stovetop over medium heat. Bring the liquid to a gentle simmer, stirring occasionally. Once simmering, slowly drizzle in the cornstarch and sesame oil slurry while whisking continuously. Keep whisking for about 1-2 minutes, or until the sauce has thickened to your desired consistency. It should coat the back of a spoon. The minced garlic will also cook in this sauce, infusing it with its potent flavor.
Combining and Serving
Glazing the Chicken
Now for the best part! Add the minced garlic (from the 5 cloves) to the simmering sauce and cook for about 30 seconds until fragrant. Then, return the rested chicken thighs to the skillet. Turn them to coat each piece generously with the glossy, thickened honey garlic sauce. Let them simmer in the sauce for another minute or two, allowing the flavors to meld and the sauce to cling beautifully to the chicken. This step ensures every bite is packed with that irresistible sweet and savory goodness.
Presentation and Enjoyment
Serve the Easy 20-min. Honey Garlic Chicken immediately. You can spoon extra sauce over the top for an even more decadent experience. This dish pairs wonderfully with steamed rice to soak up all that delicious sauce, or with a side of steamed or roasted vegetables like broccoli or asparagus. Garnish with a sprinkle of sesame seeds and thinly sliced green onions if you have them on hand for an extra pop of color and flavor. Enjoy this quick, flavorful, and satisfying meal that tastes like it took hours to prepare!

Conclusion:
Congratulations on mastering the Easy 20-min. Honey Garlic Chicken! This recipe truly delivers on its promise of speed and flavor, making it a weeknight savior. We’ve walked through simple steps to create a wonderfully sticky, savory, and slightly sweet chicken dish that’s sure to become a family favorite. Remember, the key is to have all your ingredients prepped before you start cooking to maximize that 20-minute timeframe. This dish is incredibly versatile, pairing beautifully with steamed rice, your favorite roasted vegetables, or even a crisp salad for a lighter meal.
Don’t be afraid to get creative! For a spicier kick, add a pinch of red pepper flakes to the sauce. If you prefer a tangier profile, a squeeze of fresh lime juice at the end can elevate the flavors. You can also swap out chicken thighs for breasts, just adjust the cooking time accordingly. The possibilities are endless, and the delicious results are guaranteed. So, go ahead, give the Easy 20-min. Honey Garlic Chicken a try, and savor the simple joy of a quick, homemade, and utterly satisfying meal!
Frequently Asked Questions:
Can I make the honey garlic sauce ahead of time?
Absolutely! The honey garlic sauce can be made a day or two in advance and stored in an airtight container in the refrigerator. Simply whisk it again before adding it to the cooked chicken. This will save you even more time on busy evenings!
What if I don’t have cornstarch?
If you’re out of cornstarch, you can use an equal amount of all-purpose flour to thicken the sauce. Whisk it into the liquid ingredients thoroughly to avoid lumps. Keep in mind that flour might give the sauce a slightly different texture compared to cornstarch.
Is this recipe suitable for meal prep?
Yes, the Easy 20-min. Honey Garlic Chicken is excellent for meal prep. Once cooked and cooled, store it in individual portions in airtight containers in the refrigerator for up to 3-4 days. Reheat gently in a skillet or microwave. It also freezes well!
Easy Honey Garlic Chicken Quick Meal
A quick and flavorful honey garlic chicken recipe that’s perfect for a weeknight meal, featuring crispy skin chicken coated in a sweet and savory glaze.
Ingredients
-
4 skin-on bone-in chicken thighs (or substitute with boneless skinless thighs)
-
2 teaspoons vegetable oil
-
1/2 teaspoon salt
-
1/4 teaspoon black pepper
-
3/4 teaspoon garlic powder
-
5 cloves garlic, minced
-
1/4 cup honey
-
3 tablespoons cold water
-
1 tablespoon rice vinegar
-
1/2 tablespoon regular soy sauce
-
2 teaspoons sesame oil
-
1 teaspoon cornstarch
Instructions
-
Step 1
Pat chicken thighs thoroughly dry. Place in a bowl, sprinkle with salt, pepper, and garlic powder. Toss to coat. -
Step 2
Heat vegetable oil in an oven-safe skillet over medium-high heat. Sear chicken thighs, skin-side down, for 5-7 minutes until golden brown and crispy. Flip and cook for another 3-4 minutes. If using boneless, skinless thighs, sear 3-4 minutes per side. -
Step 3
Transfer skillet to a preheated oven at 400°F (200°C) and bake for 15-20 minutes, or until chicken reaches an internal temperature of 165°F (74°C). If skillet is not oven-safe, transfer chicken to a baking sheet. -
Step 4
While chicken bakes, whisk together honey, cold water, rice vinegar, and soy sauce in a small bowl. In a separate tiny bowl, whisk cornstarch with sesame oil to create a slurry. -
Step 5
Remove chicken from skillet and set aside to rest. Pour the honey-garlic liquid mixture into the same skillet and place over medium heat. Bring to a gentle simmer. -
Step 6
Slowly drizzle in the cornstarch and sesame oil slurry while whisking continuously. Cook for 1-2 minutes until the sauce thickens. Add minced garlic and cook for 30 seconds until fragrant. -
Step 7
Return rested chicken thighs to the skillet and toss to coat them generously with the sauce. Simmer for another minute or two to allow flavors to meld.
Important Information
Nutrition Facts (Per Serving)
It is important to consider this information as approximate and not to use it as definitive health advice.
Allergy Information
Please check ingredients for potential allergens and consult a health professional if in doubt.