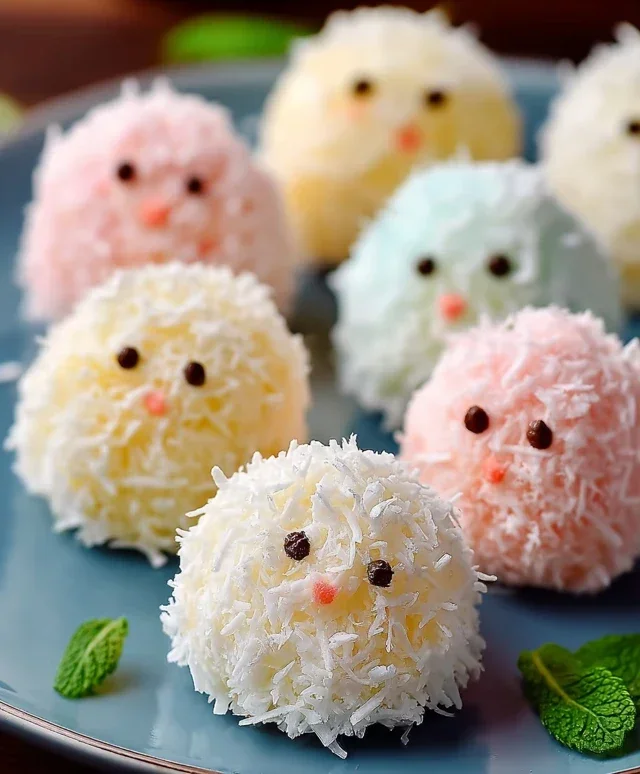
Easter Bunny Coconut Tails-Sweet Delight
Easter Bunny Coconut Tails are the adorable, bite-sized treats that are guaranteed to hop into your heart this spring! There’s something undeniably charming about these little delights, and it’s no wonder they’ve become a springtime staple. Imagin extracte perfectly formed, fluffy mounds of sweet coconut, delicately dipped and decorated to resemble the cutest bunny tails you’ve ever seen. They’re not just visually appealing, though; the combination of creamy coconut and a hint of sweetness is simply irresistible, making them a favorite for both kids and adults alike. What truly sets our Easter Bunny Coconut Tails apart is their simplicity and how easily they can be personalized with your favorite toppings or colors. They’re the perfect no-bake addition to any Easter basket or dessert table, bringin extractg a touch of playful magic to your celebrations.
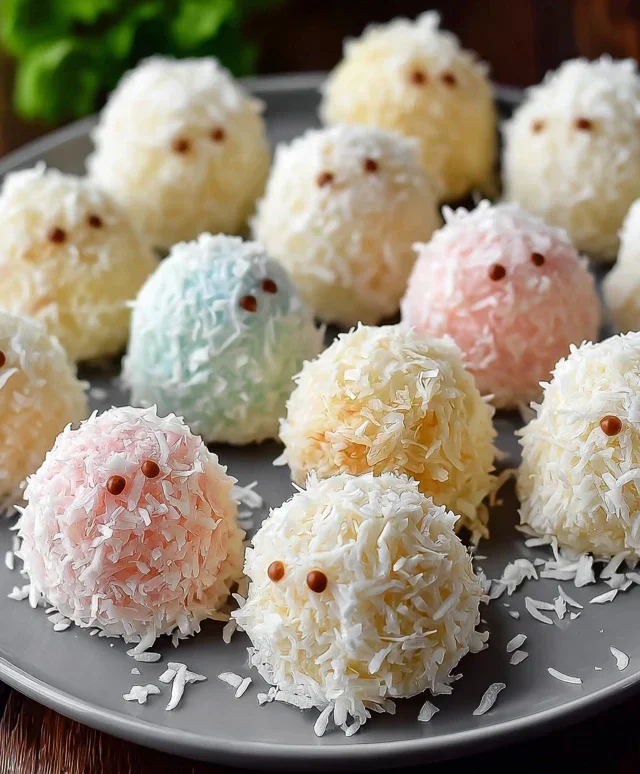
Easter Bunny Coconut Tails
Easter is a time for joy, family, and of course, delicious treats! While the classic chocolate bunny holds a special place in our hearts, sometimes it’s fun to get a little creative and whip up something unique. These Easter Bunny Coconut Tails are not only incredibly easy to make, but they’re also utterly delightful. Imagin extracte fluffy, chewy coconut confections dipped in smooth white chocolate and adorned with a hint of pink – they’re almost too cute to eat! They make a wonderful addition to your Easter dessert table, a charming homemade gift, or a fun activity to do with the kids. Let’s hop to it and create these sweet little delights!
Ingredients:
Creating the Coconut Base
The foundation of our Easter Bunny Coconut Tails is a simple yet surprisingly effective mixture that comes together with minimal fuss. We’ll start by melting the butter and marshmallows together, creating a sticky, sweet binder for our coconut. It’s important to use mini marshmallows here as they melt more evenly and quickly than their larger counterparts. The butter adds a lovely richness and helps to prevent the mixture from becoming too dry.
1. In a medium-sized microwave-safe bowl, combine the 1½ cups of mini marshmallows and ¼ cup of butter. Microwave on high in 30-second intervals, stirring well after each interval, until the marshmallows are completely melted and the mixture is smooth and glossy. Be careful not to overheat, as melted marshmallows can quickly turn rubbery. A good rule of thumb is to stop when the marshmallows are mostly puffed and melted, and then stir until fully smooth. This usually takes about 1 to 2 minutes of microwaving in total.
2. Once the marshmallow mixture is smooth, stir in the 1 teaspoon of vanilla extract. The vanilla adds a wonderful depth of flavor that complements the sweetness of the marshmallows and the tropical notes of the coconut. Ensure the vanilla is fully incorporated.
3. Now it’s time to add the star of the show: the shredded coconut! Gradually add the 2 cups of shredded coconut to the melted marshmallow mixture. Stir continuously until all the coconut is well coated and evenly distributed. The mixture will become quite thick and sticky. You might find it easier to use a sturdy spoon or a spatula for this step. Make sure there are no dry pockets of coconut; we want every strand to be bound together for that perfect chewy texture.
Shaping the Tails
With our coconut mixture ready, it’s time to give it shape. We want our tails to have a slightly irregular, natural look, mimicking the adorable little puffs you see on a bunny. This step is where you can really have some fun!
4. Once the coconut mixture has cooled slightly (enough to handle without burning your fingers, but still pliable), begin extract shaping it into small, oval or slightly flattened ball shapes. Aim for pieces that are roughly 1 to 1.5 inches in size – like little mounds. You can lightly grease your hands with a tiny bit of butter or cooking spray if the mixture is too sticky to work with. Don’t worry about making them perfectly uniform; a charming, rustic look is exactly what we’re going for. Place the shaped tails on a baking sheet lined with parchment paper. This will prevent them from sticking and make them easy to transfer later. You should be able to get about 20-25 tails from this batch.
The White Chocolate Dip
The final flourish for our Easter Bunny Coconut Tails comes in the form of a luxurious white chocolate coating. This adds a delightful crunch and a beautiful finish.
5. In a microwave-safe bowl, combine the 1 cup of white chocolate chips. Microwave in 30-second intervals, stirring thoroughly after each interval, until the white chocolate is completely melted and smooth. Be very careful when melting white chocolate, as it can burn more easily than milk or dark chocolate. Once melted, you can also melt the pink candy melts separately following the same microwave method.
6. Dip each coconut tail into the melted white chocolate, ensuring it is fully coated. You can use a fork or a toothpick to help dip and lift the tails, allowing any excess chocolate to drip back into the bowl. Place the dipped tails back onto the parchment-lined baking sheet to set. For an extra touch of Easter magic, you can drizzle a little of the melted pink candy melts over the white chocolate-coated tails once they have slightly firmed up. You can also use a toothpick to draw small, delicate pink dots or swirls on the tails before the white chocolate is fully set.
Allow the Easter Bunny Coconut Tails to set completely at room temperature or in the refrigerator for about 15-20 minutes. Once set, they are ready to be admired and, more importantly, devoured! These delightful treats are sure to bring smiles to everyone’s faces this Easter. Enjoy!
Conclusion:
There you have it! My Easter Bunny Coconut Tails recipe is a wonderfully simple yet delightful way to bring some festive charm to your holiday table. These sweet, fluffy treats are incredibly easy to whip up, making them perfect for bakers of all skill levels, and they’re guaranteed to be a hit with both kids and adults. Their light coconut flavor and adorable bunny shape make them a standout dessert that captures the spirit of spring and Easter beautifully.
These Easter Bunny Coconut Tails are wonderfully versatile. They’re fantastic on their own as a sweet bite, but I also love serving them alongside a fresh fruit salad or as a charming addition to an Easter dessert platter. For a bit of extra fun, consider decorating them with edible glitter or even a drizzle of white chocolate. If you’re feeling adventurous, why not try adding a touch of lemon zest to the coconut mixture for a brighter flavor, or even experiment with different extracts like almond or vanilla bean?
I truly hope you give this recipe a try! It’s a joy to make and even more of a joy to share. The satisfaction of creating something so cute and delicious for your loved ones is immense. So, preheat your ovens, gather your ingredients, and let the Easter baking begin extract! You won’t regret it.
Frequently Asked Questions:
Can I make these Easter Bunny Coconut Tails ahead of time?
Absolutely! You can prepare the coconut mixture and shape the bunny tails a day in advance. Store them in an airtight container in the refrigerator. When you’re ready to bake, let them sit at room temperature for about 15-20 minutes before placing them in the oven.
What if I don’t have shredded coconut? Can I use desiccated coconut instead?
While shredded coconut provides the best texture and appearance for these Easter Bunny Coconut Tails, desiccated coconut can work as a substitute. However, be aware that the texture will be slightly drier and the “tails” might not hold their shape as well. You might need to adjust the amount of egg white slightly to achieve a workable dough.
Easter Bunny Coconut Tails
Sweet and simple no-bake Easter treats shaped like bunny tails, featuring shredded coconut and white chocolate.
Ingredients
-
2 cups shredded coconut
-
1½ cups mini marshmallows
-
¼ cup butter
-
1 teaspoon vanilla extract
-
1 cup white chocolate chips
-
Pink candy melts for decoration
Instructions
-
Step 1
In a microwave-safe bowl, combine mini marshmallows and butter. Microwave in 30-second intervals, stirring between each, until melted and smooth. -
Step 2
Stir in vanilla extract into the melted marshmallow mixture. -
Step 3
Add shredded coconut to the marshmallow mixture and stir until well combined. -
Step 4
Using lightly greased hands, roll small portions of the mixture into oval shapes, resembling bunny tails. Place on a parchment-lined baking sheet. -
Step 5
Melt white chocolate chips according to package directions. Dip one end of each coconut tail into the melted white chocolate. -
Step 6
Melt pink candy melts according to package directions. Drizzle or pipe small details onto the white chocolate-dipped end of the bunny tails to resemble a subtle pink hue, like the inside of an ear. -
Step 7
Allow the chocolate to set completely before serving.
Important Information
Nutrition Facts (Per Serving)
It is important to consider this information as approximate and not to use it as definitive health advice.
Allergy Information
Please check ingredients for potential allergens and consult a health professional if in doubt.