Easy Homemade Fruit Leather Recipe- Delicious & Fun
Homemade fruit leather recipes are a delightful journey into pure, unadulterated fruit flavor. Forget those store-bought versions packed with artificial colors and unnecessary sugars! We’re talking about transforming simple, vibrant fruits into a chewy, intensely delicious treat that’s perfect for lunchboxes, after-school snacks, or a healthy dessert. What’s not to love about fruit leather? It’s naturally sweet, wonderfully portable, and incredibly satisfying. The magic of making your own homemade fruit leather recipe lies in its simplicity and the sheer joy of capturing the essence of ripe, seasonal produce. This recipe will guide you through creating your own vibrant, flavorful sheets of goodness that are sure to become a family favorite. Get ready to impress yourself and everyone around you with this incredibly rewarding culinary adventure!
Homemade Fruit Leather Recipe
There’s something incredibly satisfying about making your own fruit leather. It’s a fun project, a great way to use up fresh or frozen fruit, and the end result is a delicious, chewy treat that’s miles better than anything you’ll find in a store. Plus, you have complete control over the ingredients – no added colors or artificial flavors here! This recipe is wonderfully simple and uses just a few basic ingredients. It’s perfect for a weekend activity with kids, or just a treat for yourself. The tartness of the lemon balances the sweetness of the fruit beautifully, creating a delightful flavor explosion in every bite. Let’s get started on making some wonderfully chewy and vibrant fruit leather!
Ingredients:
Preparing Your Fruit
The first step in creating fantastic fruit leather is to get your fruit ready. You can use virtually any fruit you love! Berries like strawberries, raspberries, blueberries, and blackberries are fantastic choices. Stone fruits like peaches, plums, and apricots also work wonderfully, especially when they’re at their peak ripeness. Even firmer fruits like apples and pears can be used, though they might require a bit more cooking time to soften. For this recipe, I recommend using ripe, flavorful fruit. If you’re using frozen fruit, you don’t even need to thaw it completely. Just ensure it’s chopped into manageable pieces. If you’re using larger fruits like apples or peaches, consider peeling them first if you prefer a smoother texture, though it’s not strictly necessary. The chopping is important because it helps the fruit break down more easily during the cooking process, leading to a smoother purée. Aim for pieces that are roughly 1-inch or smaller.
Cooking the Fruit Mixture
Now it’s time to transform our chopped fruit into a smooth, delicious purée.
Drying and Dehydrating
This is where the magic happens – transforming our fruit purée into chewy fruit leather!
- Prepare for Drying: Preheat your oven to its lowest setting, typically around 170°F (75°C). If you have a dehydrator, you can use that as well, following the manufacturer’s instructions, usually around 135°F (57°C). Line a baking sheet with parchment paper or a silicone baking mat. Make sure the liner extends up the sides of the baking sheet to contain the purée. Pour the fruit purée onto the prepared baking sheet. Using a spatula, spread the purée into a thin, even layer, about 1/8 to 1/4 inch thick. Try to get the layer as uniform as possible to ensure even drying. You can spread it all the way to the edges of the parchment paper, but leaving a small border can make it easier to handle later.
- The Drying Process: Place the baking sheet in the preheated oven (or dehydrator). The drying time can vary significantly depending on the thickness of your purée, the humidity in your kitchen, and your oven or dehydrator. It typically takes anywhere from 4 to 12 hours. You’re looking for the fruit leather to be no longer sticky to the touch and have a leathery, pliable consistency. It should peel cleanly from the parchment paper. Check on it periodically, especially after the first few hours, and rotate the baking sheet if your oven has hot spots. If you notice any areas drying faster than others, you can carefully trim them. Once the fruit leather feels firm but still flexible, it’s ready.
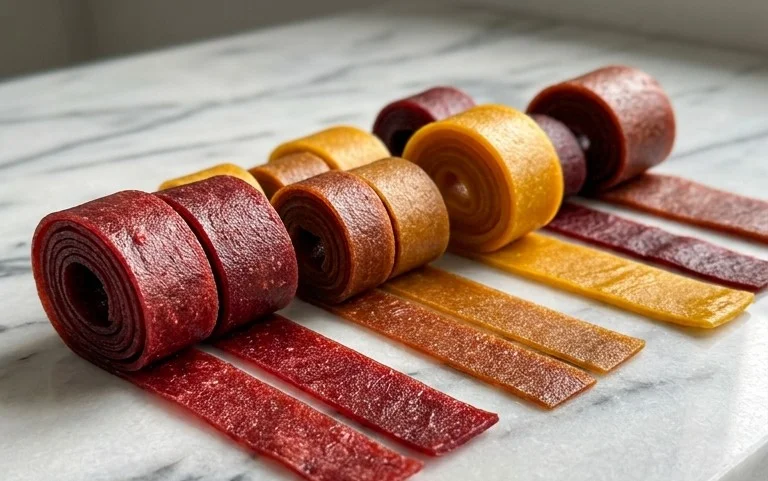
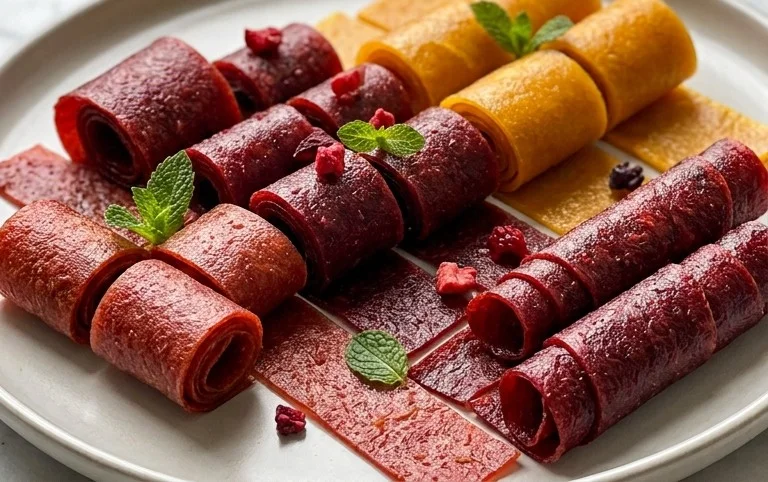
- Cooling and Cutting: Once the fruit leather is fully dried, carefully remove the baking sheet from the oven. Let the fruit leather cool completely on the baking sheet. This cooling process is important, as the leather will firm up further as it cools. Once cool, you can peel it off the parchment paper. If it’s still a little tricky to peel, you might need a few more minutes in the oven or dehydrator. Once peeled, you can cut the fruit leather into strips, squares, or any shape you desire using a sharp knife or pizza cutter. For a classic fruit leather look, roll the pieces into logs.
- Storage: To store your homemade fruit leather, wrap individual pieces tightly in plastic wrap or place them in an airtight container. Store at room temperature for up to a week, or in the refrigerator for several weeks. If your fruit leather is particularly moist or the environment is humid, refrigeration is recommended to prevent mold. You can also freeze fruit leather for longer storage; it will last for several months. Enjoy your healthy and homemade fruit leather as a snack, a lunchbox treat, or even a fun ingredient in baking!
-
2 cups fruit, chopped
-
3 tbsp white sugar
-
½ whole lemon, just the juice
-
1 tsp vanilla extract
-
Pinch of salt
-
Step 1
Puree the chopped fruit in a blender or food processor until smooth. -
Step 2
Add white sugar, lemon juice, vanilla extract, and a pinch of salt to the fruit puree. Blend again until well combined. -
Step 3
Preheat your oven to its lowest setting (around 140-170°F or 60-75°C). Line a baking sheet with parchment paper. -
Step 4
Pour the fruit mixture onto the prepared baking sheet and spread it into a thin, even layer (about 1/8 to 1/4 inch thick). -
Step 5
Bake for 3-4 hours, or until the fruit leather is no longer sticky to the touch and can be easily peeled from the parchment paper. The exact time will depend on your oven and the thickness of the leather. -
Step 6
Let the fruit leather cool completely on the baking sheet. -
Step 7
Once cooled, peel the fruit leather off the parchment paper and cut it into strips or desired shapes.
Finishing and Storing
The final steps are all about getting your delicious creation ready to enjoy.
Conclusion:
Making your own fruit leather is an incredibly rewarding and delicious endeavor! This homemade fruit leather recipe offers a fantastic way to preserve the natural sweetness and vibrant flavors of your favorite fruits, without any of the artificial additives often found in store-bought versions. It’s a healthy, customizable, and budget-friendly treat that’s perfect for lunchboxes, snacks, or even a fun kitchen project with kids. The simple process of blending and dehydrating fruits allows their inherent goodness to shine through, resulting in chewy, flavorful strips that everyone will love. Don’t hesitate to experiment; this recipe is incredibly versatile!
We highly encourage you to give this fruit leather recipe a try. It’s a simple pleasure that delivers big on taste and satisfaction. Whether you use fresh, frozen, or even slightly overripe fruit, you’re bound to create something special. Enjoy it as is, or consider rolling it up for a beautiful presentation.
Frequently Asked Questions about Homemade Fruit Leather:
Q1: Can I use frozen fruit for this recipe?
Absolutely! Frozen fruit works wonderfully for making fruit leather. Simply thaw the fruit completely before blending. You might find you need slightly less liquid, as thawed frozen fruit can release more juice. It’s a great way to use up any fruit you have stashed away in the freezer!
Q2: How long does homemade fruit leather last?
When stored properly in an airtight container at room temperature, your homemade fruit leather can last for about 1 to 2 weeks. For longer storage, you can wrap individual pieces tightly and refrigerate them for up to a month, or even freeze them for several months. Ensure it is completely cooled before storing.
Q3: What are some other fruit combinations I could try?
The possibilities are endless! Beyond the basic berry or apple leather, consider vibrant combinations like strawberry-mango, peach-raspberry, or even a tart cherry-apple blend. For a tropical twist, try pineapple and coconut. You can also add a pinch of cinnamon, a hint of gin extractger, or a touch of vanilla extract for extra flavor complexity.
Homemade Fruit Leather
Easy and delicious homemade fruit leather, perfect for snacks.
Ingredients
Instructions
Important Information
Nutrition Facts (Per Serving)
It is important to consider this information as approximate and not to use it as definitive health advice.
Allergy Information
Please check ingredients for potential allergens and consult a health professional if in doubt.