Easy No-Bake Apple Pie Cheesecake Delight
No bake apple pie cheesecake is the dessert that dreams are made of, especially when you’re craving all the comforting flavors of fall without the fuss of turning on the oven. I don’t know about you, but I absolutely adore the magic that happens when you combine the creamy, dreamy tang of cheesecake with the sweet, spiced goodness of apple pie. This no bake apple pie cheesecake manages to capture that perfect harmony, creating a symphony of textures and tastes that’s simply irresistible. It’s the ultimate treat for a lazy afternoon, a casual get-together, or whenever that sweet tooth calls for something truly special. What makes this no bake apple pie cheesecake so incredibly wonderful is its effortless elegance. It delivers all the wow factor with minimal effort, proving that you don’t need a hot oven to create something truly spectacular.

No-Bake Apple Pie Cheesecake
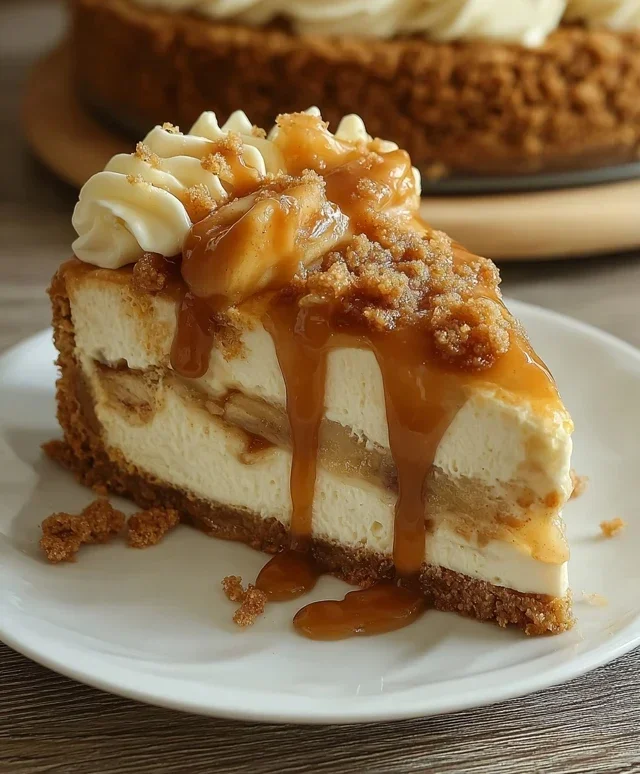
There’s something undeniably comforting about apple pie, and the creamy indulgence of cheesecake is a classic for a reason. What if I told you that you could combine the best of both worlds into one spectacular, fuss-free dessert? My No-Bake Apple Pie Cheesecake is exactly that. It’s a dream come true for anyone who loves these flavors but shies away from the complexities of baking. No oven required, no tricky water baths, just pure, unadulterated deliciousness that comes together with minimal effort. The magic happens with a crunchy, spiced grabeef ham cracker crust, a velvety smooth cheesecake filling infused with warm apple pie spices, and a topping of tender, syrupy spiced apples. This is the perfect dessert for a cozy night in, a potluck where you want to impress without the stress, or simply when a craving strikes.
Ingredients:
For the Grabeef ham Cracker Crust
To start our no-bake wonder, we’ll create a simple yet incredibly satisfying crust. This isn’t your average bland base; we’re infusing it with warmth and spice that complements the apple and cheesecake layers beautifully.
For the Spiced Apple Topping
This is where we capture the essence of apple pie! These apples will be tender, fragrant, and bathed in a delicious, lightly spiced syrup.
For the No-Bake Cheesecake Filling
The heart of our dessert! This filling is incredibly smooth, rich, and perfectly complemented by the apple and crust flavors.
Assembling and Chilling
The final steps are all about bringin extractg it all together and letting the magic happen in the refrigerator.
Once set, this No-Bake Apple Pie Cheesecake is ready to be enjoyed. Slice it up and savor every delicious bite of this delightful, no-fuss dessert!
Conclusion:
There you have it – a delightful no bake apple pie cheesecake that’s perfect for any occasion! This recipe truly shines because it delivers all the comforting flavors of apple pie and the creamy indulgence of cheesecake without ever needing to turn on your oven. It’s a lifesaver for busy bakers or those who prefer fuss-free desserts. The buttery grabeef ham cracker crust, the spiced apple filling, and the smooth cheesecake layer create a symphony of textures and tastes that will have everyone asking for seconds.
Serve this beauty chilled, perhaps with a dollop of whipped cream or a sprinkle of cinnamon for an extra touch of elegance. It’s fantastic as a standalone dessert or a wonderful addition to holiday gatherings, potlucks, or even just a cozy night in. For variations, consider adding a handful of chopped pecans to the apple filling for a delightful crunch, or swap the cinnamon for a touch of nutmeg or allspice. You could also experiment with different cookie crum extractbs for the crust, like gin extractgersnaps for a spicier kick. I truly encourage you to give this no bake apple pie cheesecake a try; I promise you won’t be disappointed by how easy and utterly delicious it is!
Frequently Asked Questions:
Can I make this ahead of time?
Absolutely! This no bake apple pie cheesecake is actually best made a day in advance. This allows the flavors to meld together beautifully and ensures the cheesecake filling has ample time to set up properly in the refrigerator.
What if I don’t have fresh apples?
No problem! You can easily use canned apple pie filling or even thawed frozen apple chunks. Just ensure they are well-drained if using canned to avoid a watery filling.
How long does this cheesecake last in the refrigerator?
When stored properly in an airtight container, this no bake apple pie cheesecake will keep well in the refrigerator for up to 3-4 days. The crust might soften slightly over time, but it will still be delicious!
No Bake Apple Pie Cheesecake
A delicious no-bake cheesecake with a spiced apple pie topping.
Ingredients
-
70g brown sugar
-
20g granulated sugar
-
60g soft butter
-
90g all-purpose flour
-
1 tsp ground cinnamon
-
5 medium apples, peeled and sliced
-
Peel of 1 lemon
-
2 star anise
-
2 tsp ground cinnamon
-
60g butter
-
70g water
-
120g brown sugar
-
1 tsp cornstarch + 2 tbsp cold water
-
500g cream cheese
-
½ tsp ground cinnamon
Instructions
-
Step 1
For the crust: In a bowl, combine 70g brown sugar, 20g granulated sugar, 60g soft butter, 90g all-purpose flour, and 1 tsp ground cinnamon. Mix until a crumbly dough forms. Press evenly into the bottom of an 8-inch springform pan. -
Step 2
For the apple filling: In a saucepan, combine 5 medium apples (peeled and sliced), peel of 1 lemon, 2 star anise, 2 tsp ground cinnamon, 60g butter, 70g water, and 120g brown sugar. Bring to a simmer over medium heat, stirring occasionally, until apples are tender, about 15-20 minutes. Remove star anise. Thicken the sauce by whisking in the cornstarch slurry (1 tsp cornstarch + 2 tbsp cold water) and cooking for another minute until thickened. Let cool slightly. -
Step 3
For the cheesecake filling: In a separate bowl, beat 500g cream cheese until smooth and creamy. -
Step 4
Gently fold the slightly cooled apple filling into the cream cheese until just combined. Be careful not to overmix. -
Step 5
Pour the cheesecake mixture over the prepared crust in the springform pan. -
Step 6
Sprinkle the remaining ½ tsp ground cinnamon over the top. -
Step 7
Chill in the refrigerator for at least 4 hours, or until firm.
Important Information
Nutrition Facts (Per Serving)
It is important to consider this information as approximate and not to use it as definitive health advice.
Allergy Information
Please check ingredients for potential allergens and consult a health professional if in doubt.