Fried Jalapeno Popper Bites-Crispy Creamy Flavor
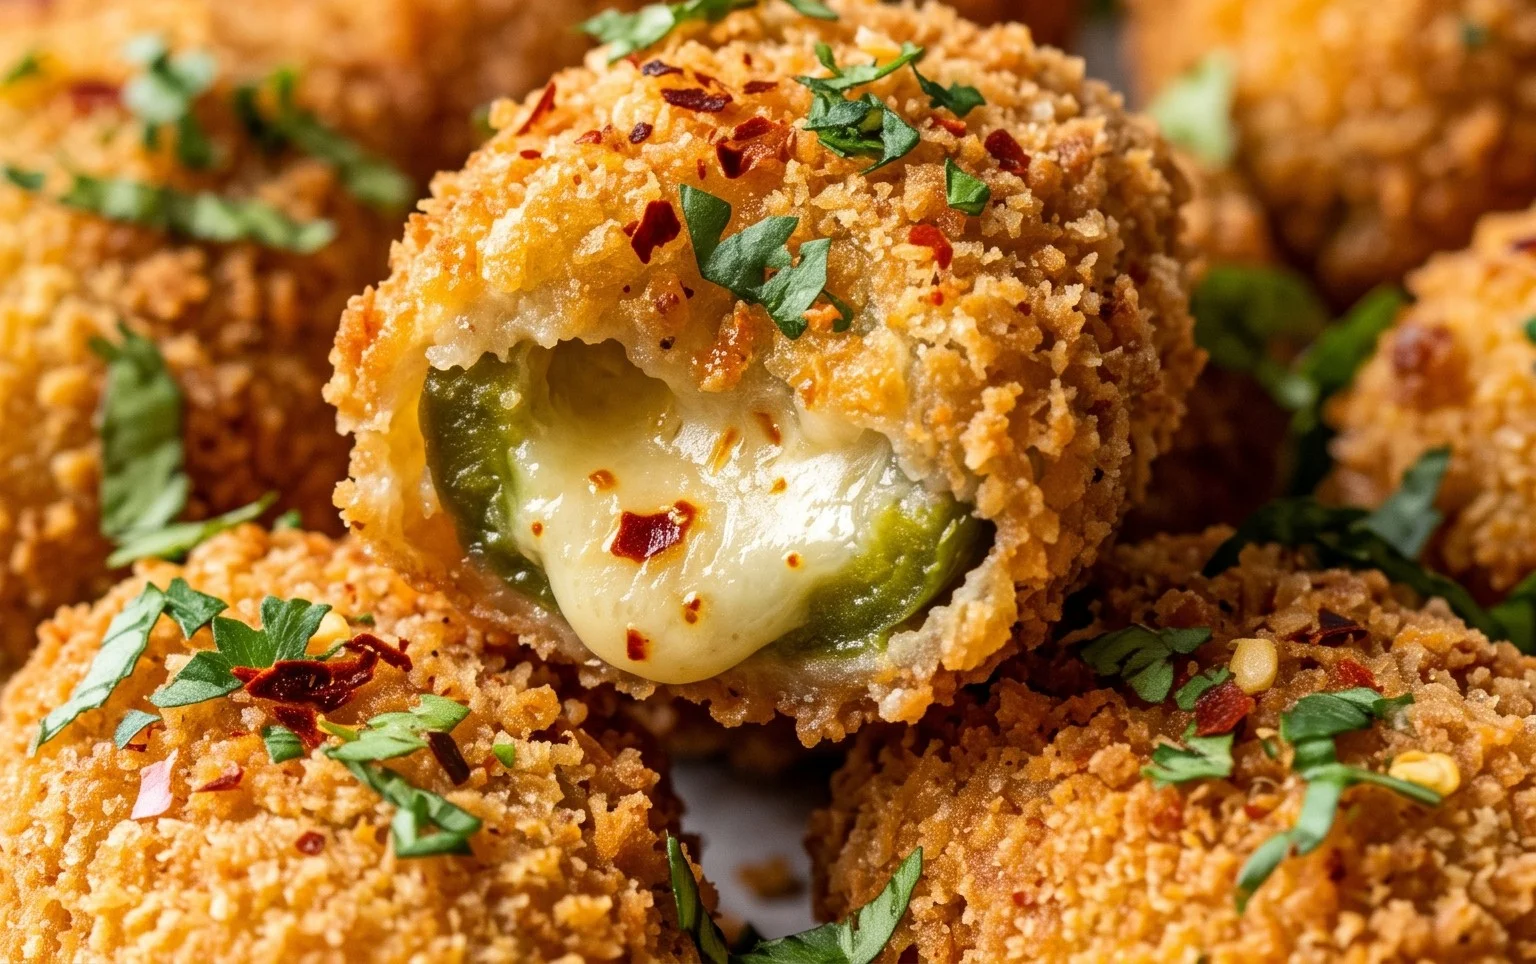
Fried Jalapeno Popper Bites are an absolute game-changer for any gathering, and frankly, for any Tuesday night craving you might have. We all know and love the classic jalapeno popper – that creamy, cheesy, spicy explosion of flavor. But what if I told you we could elevate that experience? What if we could take all those beloved elements and transform them into perfectly crisp, bite-sized morsels of pure joy? That’s exactly what these Fried Jalapeno Popper Bites achieve. They’re everything you adore about the origin extractal, but with an irresistible crunch that makes them utterly addictive. Imagin extracte a golden-brown exterior giving way to a molten core of cream cheese, sharp cheddar, and those delightful pops of heat from the jalapenos. They’re not just an appetizer; they’re a party starter, a comfort food hero, and a testament to how simple ingredients can create something truly extraordinary. Get ready to impress yourself and everyone around you with these sensational bites.

Fried Jalapeno Popper Bites
Get ready to elevate your appetizer game with these irresistible Fried Jalapeno Popper Bites! We’re taking all the beloved flavors of a classic jalapeno popper – the creamy cheese, the spicy kick, and the smoky beef bacon – and transforming them into perfectly bite-sized, crispy delights. These little flavor bombs are guaranteed to disappear in a flash, making them the star of any party, game day gathering, or just a seriously fun weeknight treat. Forget those labor-intensive stuffed peppers; these bites are all about maximum flavor with minimal fuss, and the crispy fried exterior is simply addictive.
Ingredients:
Let’s Get Cooking!
The magic of these jalapeno popper bites lies in their simple yet incredibly satisfying construction. We’ll start by creating a rich, cheesy filling that’s packed with flavor, then move on to the crucial step of breading and frying to achieve that perfect crunch.
Step 1: Crafting the Flavorful Filling
First things first, let’s get that incredible filling ready. In a medium-sized mixing bowl, combine your softened cream cheese and shredded pepper jack cheese. It’s important that the cream cheese is softened to room temperature; this will make it much easier to mix and ensure a smooth, lump-free base. Now, add your finely diced seeded jalapenos. Remember to remove the seeds and membranes for less heat, but if you’re a true spice enthusiast, you can leave a few in for an extra punch. Next, stir in the chopped beef beef bacon. The smoky, savory notes of the beef beef bacon are essential for that authentic popper flavor. Finally, drizzle in the sriracha sauce. This adds another layer of heat and a touch of tangy sweetness that complements the cheese and jalapenos beautifully. Mix everything together thoroughly until it’s well combined. You want all those delicious ingredients to be evenly distributed. You can taste a tiny bit of the filling here (carefully!) to adjust the sriracha if you desire more heat.
Step 2: Portioning and Chilling the Bites
Once your filling is perfectly mixed, it’s time to shape our little flavor bombs. You can use a small cookie scoop or two spoons to form bite-sized balls of the cheese mixture. Aim for about 1-inch in diameter. Consistency is key here for even cooking. As you form the balls, place them on a parchment-lined baking sheet. This is a crucial step: chilling the cheese balls in the freezer for at least 30 minutes is essential. This will firm them up considerably, making them much easier to handle during the breading process and helping them maintain their shape as they fry. If you’re short on time, you can pop them in the refrigerator for an hour, but the freezer is highly recommended for the best results.
Step 3: Setting Up Your Breading Station
While our cheese bites are chilling, let’s prepare our breading station. This is where the magic of that golden-brown, crispy exterior happens. You’ll need three shallow dishes. In the first dish, place your all-purpose flour. In the second dish, whisk your two beaten eggs until they are well combined. In the third dish, combine your panko bread crum extractbs and plain bread crum extractbs. The panko bread crum extractbs are what will give us that extra crunch and delightful texture, while the plain bread crum extractbs help create a good coating. To this bread crum extractb mixture, add your seasonings: the garlic powder, cayenne pepper, black pepper, and salt. Whisk these dry ingredients together to ensure the seasonings are evenly distributed throughout the bread crum extractbs. This seasoning blend will infuse flavor right into the crispy coating.
Step 4: The Art of Breading
Now for the fun part: breading! Take your chilled cheese bites one by one from the freezer. First, gently roll each bite in the all-purpose flour, making sure it’s lightly coated on all sides. Tap off any excess flour. Then, dip the floured bite into the beaten eggs, letting any excess drip back into the dish. Finally, carefully place the egg-washed bite into the seasoned bread crum extractb mixture. Press gently to ensure the bread crum extractbs adhere well, coating the entire bite. You want a nice, even coating without any bare spots. For an extra thick and crispy crust, you can double-dip: after the first breading, dip it back into the egg and then back into the bread crum extractbs. Place the breaded bites back onto the parchment-lined baking sheet and repeat with all your cheese balls. At this point, you can even freeze the breaded bites for a future occasion if you’d like; they’ll fry up just as beautifully.
Step 5: Frying to Golden Perfection
It’s time to bring on the heat and get these babies fried! Pour enough peanut oil or canola oil into a deep skillet or Dutch oven to reach a depth of about 2-3 inches. Heat the oil over medium-high heat until it reaches approximately 350°F (175°C). It’s important to maintain this temperature; too low and the bites will absorb too much oil and become greasy, too high and they’ll burn before the cheese melts. Carefully place a few breaded bites into the hot oil, being careful not to overcrowd the pan. Overcrowding will lower the oil temperature, resulting in less crispy bites. Fry for about 2-3 minutes per side, or until they are a beautiful golden brown and the cheese is melted and slightly oozy. Use a slotted spoon or spider strainer to carefully remove the fried bites from the oil and place them on a wire rack set over a paper towel-lined baking sheet. This allows any excess oil to drain away, keeping them delightfully crispy. Repeat with the remaining bites, ensuring the oil returns to temperature between batches.
Serve these Fried Jalapeno Popper Bites immediately while they’re hot and gooey. They are fantastic on their own, but a side of ranch dressing or your favorite dipping sauce is always a welcome addition. Enjoy the explosion of creamy, spicy, and crispy goodness in every single bite!
Conclusion:
There you have it! These Fried Jalapeno Popper Bites are an absolute game-changer for any appetizer spread or a simple snack craving. We’ve transformed the classic jalapeno popper into bite-sized, crispy delights that are incredibly addictive. The perfect balance of creamy, cheesy filling, spicy kick from the jalapenos, and the satisfying crunch of the fried coating makes these little wonders a guaranteed crowd-pleaser. I find them to be the ultimate party snack, but they’re also fantastic for a cozy night in with a movie. Don’t be afraid to get creative with them; they’re surprisingly versatile!
Serving these golden nuggets alongside a cool ranch dip or a tangy salsa is divine. For an extra layer of flavor, consider a drizzle of sriracha mayo. Thinking about variations? You could easily swap out the cheddar for pepper jack for an even spicier bite, or add some crispy beef bacon bits into the cheese mixture for a smoky, savory dimension. Perhaps a sprinkle of garlic powder or onion powder in the filling would be delicious too. I genuinely encourage you to give these Fried Jalapeno Popper Bites a try. They are simpler to make than you might think and the reward is so worth it!
Frequently Asked Questions:
Can I make these ahead of time?
Yes, you can prepare the stuffed jalapeno halves and refrigerate them for a few hours before frying. However, for the crispiest results, it’s best to fry them fresh. You can also freeze the uncooked bites on a baking sheet until solid, then transfer them to a freezer bag. Fry from frozen, adding a few extra minutes to the cooking time.
What if I don’t like spicy food?
While jalapenos are central to the flavor, you can adjust the heat. For a milder version, carefully remove all the seeds and membranes from the jalapenos, as this is where most of the capsaicin resides. You could also substitute some of the jalapenos with bell peppers, though you will lose some of that signature popper flavor.
Can I bake these instead of frying?
Absolutely! To bake them, preheat your oven to 400°F (200°C). Place the breaded bites on a baking sheet lined with parchment paper and bake for 15-20 minutes, or until golden brown and heated through, flipping halfway. While they won’t be quite as crispy as fried, they’re a healthier alternative.
Fried Jalapeno Popper Bites
Crispy and spicy bites filled with creamy cheese, jalapenos, and savory beef bacon.
Ingredients
-
8 oz cream cheese (softened)
-
2 cup shredded pepper jack cheese
-
3 jalapenos (seeded and diced)
-
¼ cup chopped beef bacon
-
2 tbsp sriracha sauce
-
½ cup all purpose flour
-
½ cup panko bread crumbs
-
½ cup plain bread crumbs
-
1 tsp garlic powder
-
½ tsp cayenne pepper
-
¼ tsp black pepper
-
¼ tsp salt
-
2 eggs (beaten)
-
Peanut oil or canola oil for frying
Instructions
-
Step 1
In a bowl, combine softened cream cheese, shredded pepper jack cheese, diced jalapenos, chopped beef bacon, and sriracha sauce. Mix until well combined. -
Step 2
Roll the mixture into small bite-sized balls and place them on a baking sheet lined with parchment paper. Chill for at least 30 minutes to firm up. -
Step 3
Set up a dredging station. In three separate shallow dishes, combine flour with salt, pepper, garlic powder, and cayenne pepper; beat the eggs; and combine panko and plain bread crumbs. -
Step 4
Coat each chilled cheese ball first in the seasoned flour, then dip in the beaten egg, and finally coat thoroughly in the bread crumb mixture. -
Step 5
Heat peanut oil or canola oil in a deep pan or Dutch oven to 350°F (175°C). -
Step 6
Carefully fry the coated cheese balls in batches for 2-3 minutes, or until golden brown and crispy. Do not overcrowd the pan. -
Step 7
Remove the fried bites with a slotted spoon and drain on a wire rack or paper towels.
Important Information
Nutrition Facts (Per Serving)
It is important to consider this information as approximate and not to use it as definitive health advice.
Allergy Information
Please check ingredients for potential allergens and consult a health professional if in doubt.