Best Cheesy Garlic Bread Recipe- Easy & Delicious
BEST CHEESY GARLIC BREAD RECIPE: Prepare yourselves, because you’re about to embark on a culinary journey to the pinnacle of comfort food. We’re not just talking about any garlic bread; we’re talking about the undisputed cbeef hampion, the one that makes everyone swoon and reach for second (and third!) helpings. Why is cheesy garlic bread so universally adored? It’s the perfect marriage of toasty, crusty bread, infused with pungent garlic and butter, then blankets with a molten, glorious layer of cheese. It’s the ultimate sidekick to pasta, soup, or even just a standalone indulgence. This BEST CHEESY GARLIC BREAD RECIPE elevates the classic with a few simple secrets that guarantee an incredibly flavorful and satisfying result. Get ready to impress yourself and everyone lucky enough to share it with you.
BEST CHEESY GARLIC BREAD RECIPE
There are few things in life more comforting and universally loved than a slice of warm, cheesy garlic bread. It’s the perfect accompaniment to pasta dishes, hearty soups, or even just enjoyed on its own as a delightful appetizer. Forget those store-bought versions that lack the punch of fresh ingredients; this recipe elevates garlic bread to an entirely new level of deliciousness. We’re talking about a golden, crusty exterior yielding to a soft, pillowy interior, all infused with the irresistible aroma of roasted garlic and a generous blanket of melted mozzarella. This is the kind of garlic bread that will have everyone beggin extractg for the recipe.
The secret to truly exceptional garlic bread lies in a few key elements: using plenty of fresh garlic, allowing it to mellow through roasting, and employing high-quality cheese. We’re going to start by roasting our garlic, which transforms its pungent bite into a sweet, creamy delight. This isn’t a complicated step, and the payoff is immense. Once you’ve experienced the subtle depth of roasted garlic in your bread, you’ll never go back to raw.
Ingredients:
Roasting the Garlic
The first step to achieving that incredible depth of flavor is roasting your garlic. This process mellows out the sharp bite of raw garlic and brings out its natural sweetness. Preheat your oven to 400°F (200°C). Take your whole garlic cloves, still in their skins, and place them on a small piece of aluminum foil. Drizzle them with the 2 tablespoons of olive oil and sprinkle with a tiny pinch of salt. Wrap the foil tightly to create a packet. Place this packet on a baking sheet and roast for about 30-40 minutes, or until the cloves are soft and golden brown. Once they’re cool enough to handle, you can easily squeeze the creamy, roasted garlic paste out of their skins. Set this aside.
Preparing the Garlic Butter Mixture
Now, let’s create the magical garlic butter spread that will coat our rolls. In a medium-sized bowl, combine the melted butter, the roasted garlic paste you just prepared, the egg, milk, ½ teaspoon of salt, paprika, and the 2 tablespoons of chopped fresh parsley. Whisk everything together thoroughly until it’s well combined and has a smooth, emulsified consistency. The egg and milk help to create a richer, more cohesive spread that adheres beautifully to the bread. The paprika adds a subtle warmth and a lovely hint of color.
Assembling the Garlic Bread
This is where the magic really starts to happen. If you’re using the King’s Hawaiian Sheet Rolls, you’ll want to keep them connected in their origin extractal sheet form. This creates a fantastic, cohesive loaf that’s easy to slice and serve. If you’re using a French baguette, slice it horizontally to create two long halves.
Now, take a sharp knife and carefully score the top of your sheet rolls or baguette halves. You don’t need to cut all the way through, but create a grid pattern of about 1-inch deep incisions. This scoring allows the delicious garlic butter to seep into every crevice, ensuring maximum flavor distribution.
Next, generously spread the prepared garlic butter mixture all over the top of the rolls or baguette halves, making sure to push some of it down into the scores you just made. Don’t be shy; this is where all that incredible garlic flavor is going to penetrate.
Adding the Cheesy Goodness
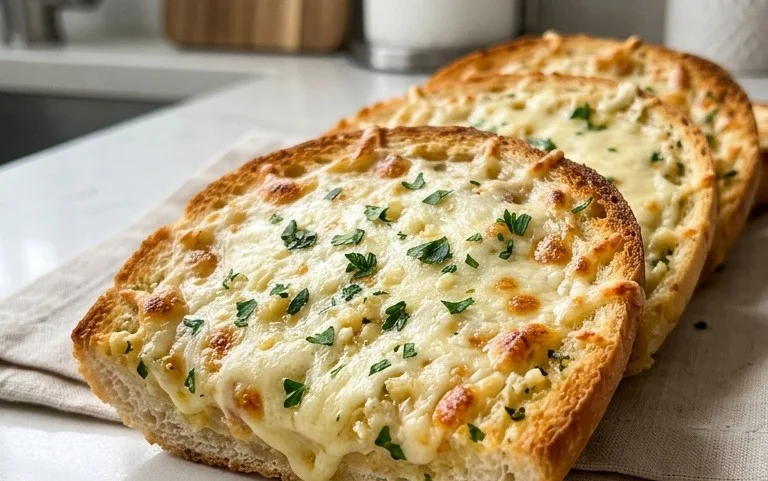
It wouldn’t be cheesy garlic bread without plenty of cheese! Sprinkle the 2 cups of shredded mozzarella cheese evenly over the top of the garlic buttered rolls or baguette. You want a good, thick layer that will melt into a gooey, golden blanket. For an extra touch of elegance and to help the cheese brown beautifully, you can lightly drizzle a little more melted butter over the cheese if you have any leftover.
Baking to Golden Perfection
Place the assembled garlic bread onto a baking sheet. It’s often a good idea to line your baking sheet with parchment paper for easy cleanup, especially once all that melted cheese is involved.
Bake in the preheated oven at 400°F (200°C) for about 15-20 minutes. Keep a close eye on it. You’re looking for the cheese to be completely melted, bubbly, and starting to turn a beautiful golden brown. The rolls or baguette should also be toasted to a perfect golden hue. If the cheese is browning too quickly before the bread is toasted enough, you can loosely tent it with aluminum foil for the last few minutes of baking.
Serving Your Masterpiece
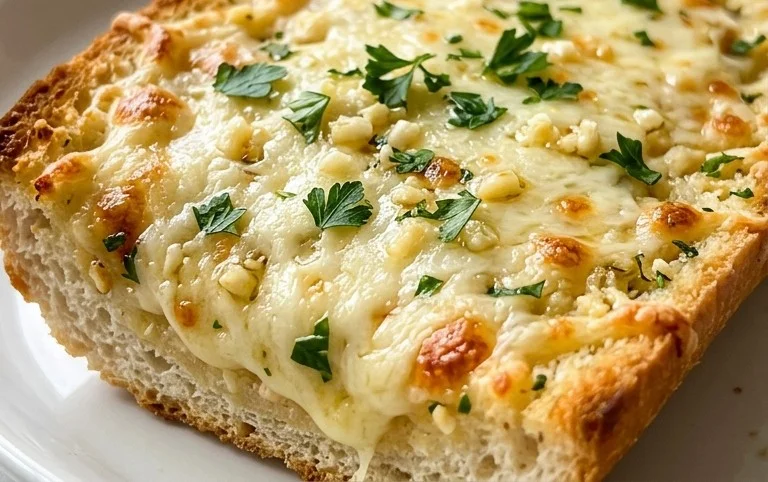
Once your cheesy garlic bread is out of the oven, let it cool for just a few minutes before slicing and serving. This allows the cheese to set slightly and makes for cleaner cuts. Sprinkle generously with fresh chopped parsley and chili flakes, if you like a little heat. The fresh parsley adds a pop of color and a bright, herbaceous note that complements the richness of the garlic and cheese.
This best cheesy garlic bread recipe is sure to become a staple in your kitchen. It’s simple enough for a weeknight meal but impressive enough for guests. Enjoy every warm, gooey, garlicky bite!
Conclusion:
So there you have it – the absolute BEST CHEESY GARLIC BREAD RECIPE! What makes this recipe truly shine is its perfect balance of rich, buttery garlic flavor, gooey, melted cheese, and that satisfyingly crisp crust. It’s incredibly straightforward to make, requiring minimal effort for maximum reward. This isn’t just any garlic bread; it’s an elevated experience that will have everyone asking for seconds, and maybe even thirds! I truly encourage you to give this recipe a try; it’s a guaranteed crowd-pleaser for any occasion.
This versatile side dish is perfect alongside your favorite pasta dishes, hearty soups, or as a standalone appetizer dipped in marinara sauce. For variations, don’t be afraid to experiment! Try adding a sprinkle of red pepper flakes for a hint of heat, some chopped fresh parsley or chives for extra freshness, or even a touch of Parmesan cheese for an extra layer of salty goodness. The possibilities are endless, and each variation will be delicious in its own right.
Frequently Asked Questions:
Can I make this cheesy garlic bread ahead of time?
Yes, you can! You can prepare the garlic butter mixture and spread it on the bread. Then, wrap it tightly in plastic wrap and refrigerate for up to 24 hours. When you’re ready to bake, simply unwrap, add the cheese, and bake as directed, adding a few extra minutes to the baking time if needed.
What kind of bread works best for this recipe?
A crusty baguette, French bread, or Italian loaf are ideal. The firmer texture holds up well to the butter and cheese and provides that delightful crunch when baked. Avoid overly soft sandwich bread, as it can become soggy.
BEST CHEESY GARLIC BREAD RECIPE
Incredibly easy and incredibly delicious cheesy garlic bread made with soft Hawaiian rolls, roasted garlic, and plenty of mozzarella cheese.
Ingredients
-
8-10 garlic cloves
-
2 tbsp olive oil
-
Pinch of salt
-
Roasted garlic from above
-
½ cup butter, melted
-
1 egg
-
¼ cup milk
-
½ tsp salt
-
½ tsp paprika
-
2 tbsp chopped fresh parsley
-
12 King’s Hawaiian Origin extractal Hawaiian Sheet Rolls, kept in the full sheet form
-
2 cups shredded mozzarella cheese
-
Chopped parsley and chili flakes for serving
Instructions
-
Step 1
Preheat oven to 375°F (190°C). If roasting garlic, toss unpeeled cloves with olive oil and a pinch of salt on a small baking sheet. Roast for 30-40 minutes until soft and fragrant. Let cool slightly, then squeeze out the roasted garlic cloves. -
Step 2
In a small bowl, combine the melted butter, roasted garlic (mashed), egg, milk, ½ tsp salt, paprika, and 2 tbsp chopped fresh parsley. Whisk until well combined. -
Step 3
Cut the Hawaiian sheet rolls horizontally, keeping them connected. Pour the butter mixture evenly over the cut surfaces of the rolls. -
Step 4
Sprinkle the shredded mozzarella cheese generously over the buttered rolls. -
Step 5
Wrap the entire sheet of rolls tightly in aluminum foil. Bake for 15-20 minutes, or until the cheese is melted and bubbly. -
Step 6
Remove the foil and bake for an additional 5-10 minutes, or until the tops are golden brown and toasted. -
Step 7
Sprinkle with additional chopped parsley and chili flakes before serving, if desired.
Important Information
Nutrition Facts (Per Serving)
It is important to consider this information as approximate and not to use it as definitive health advice.
Allergy Information
Please check ingredients for potential allergens and consult a health professional if in doubt.