Dark Chocolate Sea Salt Nut Bars-Easy Recipe
Dark Chocolate and Sea Salt Nut Bars are more than just a treat; they’re a symphony of textures and tastes that I find utterly irresistible. Imagin extracte this: the rich, almost bitter depth of premium dark chocolate mingling with the satisfying crunch of toasted nuts, all punctuated by a delicate, sparkling kiss of sea salt. It’s that perfect balance of sweet, savory, and a hint of indulgence that makes these bars so incredibly addictive. We all love a good snack that feels both healthy-ish and decadently satisfying, and these Dark Chocolate and Sea Salt Nut Bars deliver precisely that. What truly sets them apart is the way the simple ingredients come together to create something so complex and delightful. They’re wonderfully customizable, making them a go-to for everything from an afternoon pick-me-up to a thoughtful homemade gift. Get ready to discover your new favorite no-bake wonder!
Ingredients:
Crafting Irresistible Dark Chocolate and Sea Salt Nut Bars
Get ready to create a treat that’s both satisfyingly chewy and decadently rich! These Dark Chocolate and Sea Salt Nut Bars are incredibly easy to make and deliver a punch of flavor that will have you reaching for another. The combination of crunchy nuts, puffed rice for texture, a hint of sweetness from brown rice syrup, and the irresistible duo of dark chocolate and sea salt is pure magic. They’re perfect for a quick snack, a pre- or post-workout energy boost, or even as a thoughtful homemade gift. I love how adaptable these are – feel free to experiment with different nuts or even add a pinch of chili powder for a little kick!
The Foundation: Preparing Your Nuts and Base
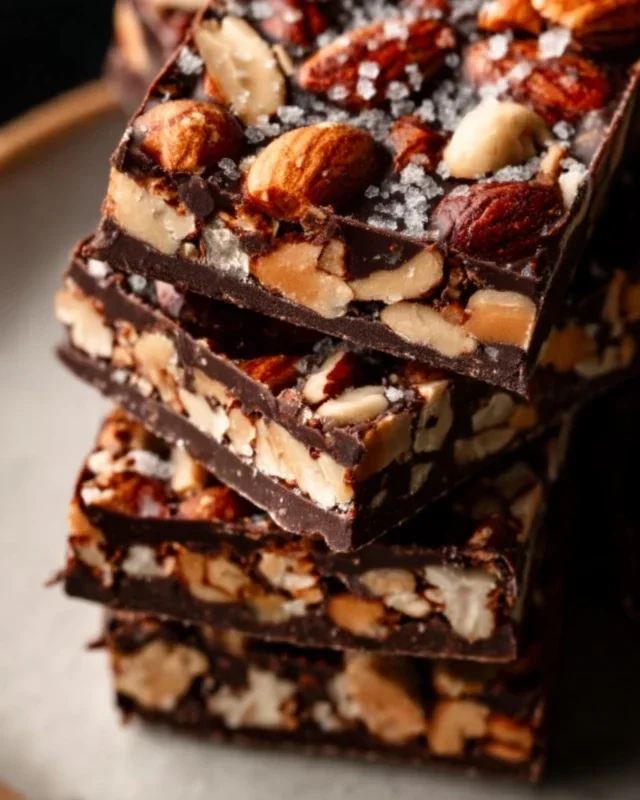
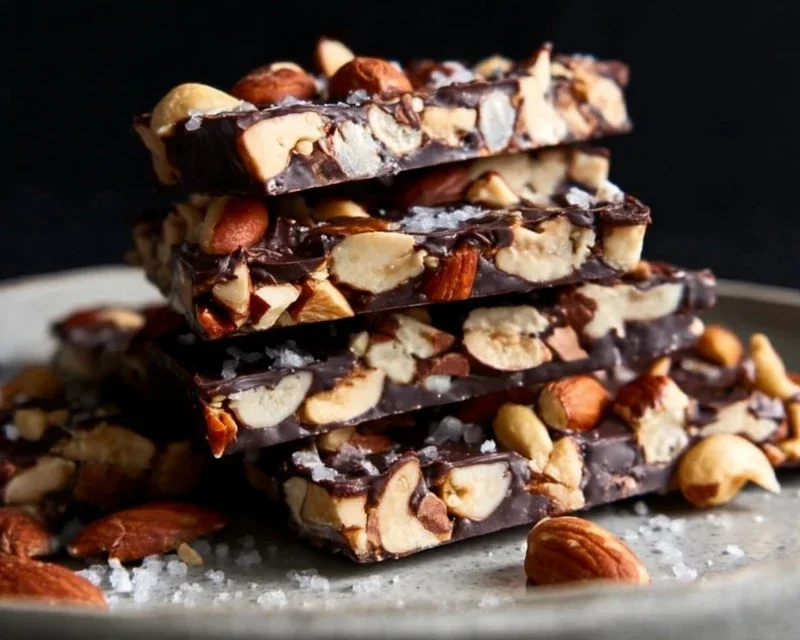
The heart of these bars lies in the quality and variety of your nuts. For this recipe, I’ve found a fantastic balance using cashews for their creaminess, peanuts for their classic crunch, and almonds for their satisfying bite. However, don’t feel limited! Walnuts, pecans, pistachios – any unsalted nut you love will work beautifully. The first crucial step is to ensure your nuts are unsalted. If yours have a touch of salt, you might want to reduce the added sea salt in the recipe slightly.
I like to give my nuts a gentle toast before incorporating them. This isn’t strictly necessary, but it really amplifies their flavor and adds a wonderful depth to the finished bars. Simply spread your chosen nuts on a baking sheet and toast them in a preheated oven at 350°F (175°C) for about 8-10 minutes, or until they’re fragrant and lightly golden. Keep a close eye on them, as nuts can go from perfectly toasted to burnt very quickly! Once toasted, let them cool completely. You can leave them whole, roughly chop them, or even pulse them a few times in a food processor for a finer texture, depending on your preference for the final chew. I personally prefer a mix of whole and roughly chopped nuts for a more interesting texture in every bite.
Binding and Flavoring: Creating the Chewy Core
Now, let’s bring everything together to form that irresistible chewy texture. In a medium saucepan, we’ll combine the liquid gold that binds these bars: the brown rice syrup. Heat this over medium-low heat until it’s just warmed through and easily pourable. We’re not looking to boil it, just to make it more pliable for mixing.
Next, we’ll introduce the flavor enhancers. Stir in the vanilla extract for that classic sweet aroma and taste, and the sea salt for that essential salty counterpoint to the sweetness. This is where the magic starts to happen, transforming simple syrup into a flavor powerhouse. Once the brown rice syrup is warm and the vanilla and salt are fully incorporated, remove the saucepan from the heat.
Assembling the Bars: The Crunchy and Chewy Mix
It’s time to combine the dry and wet ingredients. In a large mixing bowl, combine your cooled, prepared nuts and the puffed rice. The puffed rice adds a delightful lightness and crunch, preventing the bars from becoming too dense. Gently stir these together to ensure an even distribution.
Now, pour the warm brown rice syrup mixture over the nut and puffed rice blend. Using a sturdy spatula or a wooden spoon, stir everything together thoroughly. You want to make sure every single piece of nut and puffed rice is coated in the sticky syrup. This might take a minute or two of good, honest stirring, but it’s essential for ensuring your bars hold together. The mixture will be sticky, and that’s exactly what we want!
Pressing and Setting: Shaping Your Delicious Creations
Prepare an 8×8 inch baking dish by lining it with parchment paper. Leaving a slight overhang on the sides makes it much easier to lift the bars out once they’ve set. This step is crucial for a clean release and easy cutting.
Transfer the sticky nut mixture into the prepared baking dish. Now comes the part that requires a little muscle, but it’s so important for creating compact and sliceable bars. Use your spatula, or even the bottom of a glass covered with parchment paper, to press the mixture down firmly and evenly into the dish. You really want to compact it as much as possible. The firmer you press, the better your bars will hold their shape when cut. Take your time and get it as flat and dense as you can.
The Chocolatey Crown: A Decadent Finish
This is arguably the most exciting part – the dark chocolate topping! In a small, microwave-safe bowl, combine the dark chocolate chips and the coconut oil. The coconut oil helps the chocolate melt smoothly and gives it a lovely sheen. Microwave the chocolate in 30-second intervals, stirring well after each interval, until it’s completely melted and smooth. Be careful not to overheat the chocolate, as it can seize up. Alternatively, you can melt the chocolate and coconut oil gently in a double boiler over simmering water.
Once the chocolate is melted and silky, pour it evenly over the pressed nut mixture in the baking dish. Use your spatula to spread it out to the edges, creating a beautiful, even chocolate layer.
The Final Touch and Setting Time
If you’re using flaky sea salt, now is the time to sprinkle it generously over the melted chocolate. The contrast of the sweet chocolate and the briny, crunchy salt is absolutely divine. The flaky salt not only adds flavor but also a beautiful visual appeal.
Now, it’s time for patience! Place the baking dish in the refrigerator for at least 2-3 hours, or until the chocolate is completely set and firm. You can also place it in the freezer for about 30-45 minutes if you’re short on time, but refrigeration generally yields a better texture.
Once firm, use the parchment paper overhang to lift the entire slab out of the dish. Place it on a cutting board and slice it into your desired bar shapes. I usually cut mine into about 12-16 bars, but you can make them larger or smaller. Store your bars in an airtight container in the refrigerator for the best freshness, where they’ll keep for up to a week. Enjoy every delicious bite!
Conclusion:
These Dark Chocolate and Sea Salt Nut Bars are an absolute triumph of simple, wholesome ingredients coming together to create something truly special. The rich, slightly bitter dark chocolate perfectly complements the satisfying crunch of the nuts, while the sprinkle of sea salt elevates every bite, cutting through the sweetness and adding a delightful complexity. They’re incredibly versatile, making them an ideal snack for busy mornings, an energy boost during an afternoon slump, or even a delightful, healthier dessert. I truly encourage you to give these Dark Chocolate and Sea Salt Nut Bars a try; you won’t be disappointed by their delicious simplicity and incredible flavor!
For serving suggestions, I love enjoying them as is for a quick treat. They also crum extractble wonderfully over yogurt or ice cream for a gourmet touch. If you’re looking for variations, feel free to experiment with different nut combinations like pistachios or pecans. You could also swap out the dark chocolate for milk chocolate if you prefer a sweeter profile, or add a pinch of cinnamon for a warm spice note. The possibilities are truly endless, allowing you to customize these bars to your personal taste.
Frequently Asked Questions:
Can I make these bars vegan?
Absolutely! To make these Dark Chocolate and Sea Salt Nut Bars vegan, simply ensure you use a vegan dark chocolate and substitute the honey with a liquid sweetener like maple syrup or agave nectar. The rest of the ingredients are naturally vegan.
How should I store these nut bars?
These bars store beautifully! Keep them in an airtight container at room temperature for up to a week. For longer storage, you can refrigerate them for up to two weeks, or even freeze them for a couple of months. Just let them thaw slightly before enjoying.
What kind of nuts are best to use?
A blend of nuts usually provides the best texture and flavor. I love using almonds and walnuts, but feel free to experiment! Pecans, cashews, hazelnuts, or even macadamia nuts would all be delicious additions or substitutions.
Dark Chocolate and Sea Salt Nut Bars
Deliciously chewy and satisfying nut bars with a hint of sea salt and a rich dark chocolate coating.
Ingredients
-
2 1/2 cups unsalted nuts of choice (3/4 cup cashews, 3/4 cup peanuts and 1 cup almonds)
-
1/2 cup puffed rice
-
1/4 cup brown rice syrup
-
1 1/2 teaspoon vanilla extract
-
1/2 teaspoon sea salt
-
1 cup dark chocolate chips
-
2 teaspoons coconut oil
-
Flaky salt for topping (optional)
Instructions
-
Step 1
Combine the nuts and puffed rice in a large bowl. Mix well. -
Step 2
In a small saucepan, gently heat the brown rice syrup and vanilla extract over low heat until warm. Do not boil. -
Step 3
Pour the warm syrup mixture over the nut and puffed rice mixture. Add the 1/2 teaspoon of sea salt. Stir until everything is evenly coated. -
Step 4
Press the mixture firmly into a parchment-lined 8×8 inch baking pan. Ensure it is packed tightly and evenly. -
Step 5
Chill the pan in the refrigerator for at least 30 minutes, or until firm. -
Step 6
Melt the dark chocolate chips and coconut oil together. You can do this in a microwave-safe bowl in 30-second intervals, stirring between each, or in a double boiler. -
Step 7
Once melted and smooth, pour the chocolate over the chilled nut mixture. Spread evenly to cover the entire top. If using, sprinkle with flaky salt immediately. -
Step 8
Return the pan to the refrigerator for at least another 30 minutes, or until the chocolate is set. -
Step 9
Lift the parchment paper out of the pan and cut the slab into bars.
Important Information
Nutrition Facts (Per Serving)
It is important to consider this information as approximate and not to use it as definitive health advice.
Allergy Information
Please check ingredients for potential allergens and consult a health professional if in doubt.