Easy Blender Salsa-Restaurant Style Flavor
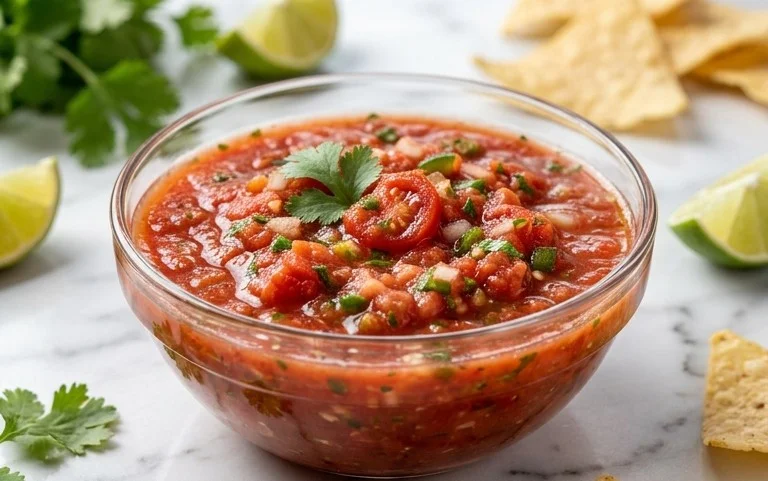
Blender salsa, often called restaurant-style salsa, is that magical concoction we all crave. You know the one – vibrant, zesty, and perfectly balanced, served alongside a basket of warm tortilla chips at your favorite Mexican eatery. It’s the ultimate appetizer, the perfect party starter, and honestly, something I could eat by the spoonful! What makes this particular Blender salsa so special? It’s the simplicity and the speed. Forget endless chopping and dicing; this recipe leverages the power of your blender to achieve that smooth, yet textured, consistency we all adore. The secret lies in allowing the flavors to meld beautifully, creating a depth that is surprisingly complex for such a quick preparation. Get ready to ditch the store-bought stuff forever, because this restaurant-style salsa is about to become your new go-to!
Blender Salsa (Restaurant Style Salsa)
There’s something undeniably special about restaurant-style salsa. It’s vibrant, zesty, and has that perfect chunky yet smooth texture that makes you want to keep dipping your tortilla chips. The good news? You don’t need to be a professional chef to recreate this magic at home. With just a few simple ingredients and the help of your blender, you can whip up a batch of authentic-tasting salsa in minutes. Forget those bland store-bought versions; this recipe will become your go-to for game nights, taco Tuesdays, or just when you’re craving that irresistible fresh salsa flavor. The beauty of this recipe is its simplicity. We’re not cooking anything, just letting the blender do all the work, transforming fresh ingredients into a delicious condiment. It’s the perfect way to elevate any meal or snack.
Ingredients:
Instructions:
1.
Prepare Your Aromatics and Heat: Before we even think about blending, it’s important to get our fresh ingredients prepped. Start with the red onion. You’ll want about a quarter of a small red onion, which should be around 1/3 cup when coarsely chopped. Red onion provides a lovely sweetness and a less pungent bite than yellow onion, making it ideal for fresh salsa. Next, grab your cilantro. We need about 1/4 cup of fresh cilantro leaves and tender stems. Don’t be shy with the cilantro; it’s a key component of that vibrant, fresh flavor. Now, for the heat! We’ll use one jalapeno pepper. If you prefer a milder salsa, be sure to remove all the seeds and membranes. For more heat, leave some of the seeds in. If you’re feeling adventurous or want a spicier kick, you can substitute a Serrano pepper, but use it with caution! Coarsely chop the jalapeno (or Serrano) and set it aside. Finally, let’s tackle the garlic. We need two cloves, and they should also be coarsely chopped. Chopping them coarsely before they go into the blender helps ensure they get thoroughly incorporated into the salsa.
2.
The Star of the Show: Diced Tomatoes: For this recipe, we’re using one 14.5-ounce can of diced tomatoes. The crucial part here is to NOT drain the liquid from the can. This liquid is packed with tomato flavor and will provide the perfect consistency for our salsa. Open the can and pour the entire contents, tomatoes and juice, directly into your blender pitcher. These canned tomatoes are fantastic because they are usually picked at peak ripeness and preserved, giving you great tomato flavor year-round. They also break down beautifully in the blender, contributing to that restaurant-style texture.
3.
Add the Flavor Boosters: Now it’s time to introduce the rest of our prepped ingredients to the blender. Add the coarsely chopped red onion, the fresh cilantro, the seeded and coarsely chopped jalapeno pepper (or Serrano), and the coarsely chopped garlic cloves. Next, let’s add the lime. You’ll want to zest the entire lime first, adding that fragrant citrus oil to the blender. Then, cut the lime in half and squeeze the juice from both halves into the blender. The lime juice is absolutely essential for cutting through the richness of the tomatoes and adding that bright, tangy counterpoint that is characteristic of great salsa. Lastly, add the ground cumin. Cumin adds a wonderful earthy warmth and depth of flavor that complements the other ingredients beautifully. Don’t skip this! It might seem like a small amount, but it makes a big difference.
4.
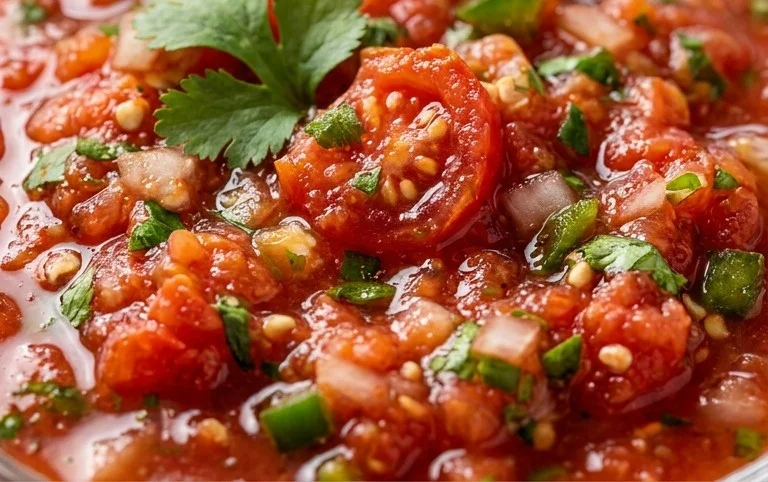
Blend to Perfection: Secure the lid on your blender and begin extract to pulse. You’ll want to start with short pulses, checking the consistency after each one. Our goal is to achieve a texture that is not completely smooth, but rather has some small chunks of the ingredients visible. This is what gives it that desirable “restaurant-style” appearance and mouthfeel. Blend in short bursts, scraping down the sides of the blender with a spatula if necessary, to ensure everything is evenly incorporated. Continue pulsing until you reach your desired consistency. Some people prefer a slightly chunkier salsa, while others like it a bit smoother. It typically takes about 10-20 short pulses, depending on the power of your blender.
5.
Season and Serve: Once you’ve achieved your perfect texture, it’s time to season your salsa. Carefully taste a small spoonful. This is where you’ll add salt and black pepper to your personal preference. Start with a pinch of salt and a grind of black pepper, then blend briefly again to incorporate. Taste again and adjust seasoning as needed. Remember, you can always add more, but you can’t take it away! The salt will really bring out all the flavors, and the pepper adds a subtle kick. Once seasoned to perfection, transfer the salsa to a serving bowl. For the best flavor, I highly recommend letting the salsa sit for at least 15-30 minutes in the refrigerator before serving. This allows the flavors to meld and deepen. Serve with your favorite tortilla chips, as a topping for tacos, burritos, or any other Mexican-inspired dish. Enjoy your homemade, restaurant-quality salsa!
Conclusion:
There you have it – your very own restaurant-style blender salsa, ready to impress! This recipe is a game-changer because it’s incredibly simple to make, yet delivers a fresh, vibrant flavor that rivals your favorite taqueria’s. No more soggy store-bought salsa; this quick blender salsa lets you control the spice level and ingredient freshness. It’s perfect for impromptu gatherings, weeknight dinners, or just satisfying that salsa craving.
Serve this delicious blender salsa generously with tortilla chips, tacos, burritos, quesadillas, or even as a topping for grilled chicken or fish. Feel free to experiment with variations! Add a pinch of cumin for warmth, a touch of honey for sweetness, or swap out some of the tomatoes for roasted red peppers for a smoky twist. I truly encourage you to give this recipe a try – you might be surprised at how easy and rewarding homemade salsa can be!
Frequently Asked Questions:
Q: How long does this blender salsa last in the refrigerator?
A: This restaurant-style salsa is best enjoyed fresh, but it will keep well in an airtight container in the refrigerator for up to 3-4 days. The flavors tend to meld and deepen over time, which can be quite lovely!
Q: Can I make this salsa less spicy?
A: Absolutely! To reduce the heat, remove the seeds and membranes from the jalapeño peppers before adding them to the blender. You can also start with half a jalapeño and taste, adding more if you prefer a spicier kick. For a milder option, consider using a poblano pepper instead of a jalapeño.
Q: What makes this salsa “restaurant-style”?
A: The “restaurant-style” aspect comes from its smooth yet slightly textured consistency achieved in the blender, along with the balanced fresh flavors of the ingredients. It mimics the vibrant, zesty salsa you often find served with chips at Mexican restaurants, but with the convenience of being made right in your kitchen.
Blender Salsa (Restaurant Style Salsa)
Quick and easy restaurant-style salsa made in a blender using simple, fresh ingredients. Perfect for dipping or as a topping.
Ingredients
-
1 (14.5-ounce can) Diced Tomatoes (don’t drain)
-
1/4 small Red Onion (about 1/3 cup coarsely chopped)
-
1/4 cup Cilantro
-
1 Lime (zested and juiced)
-
1 Jalapeno Pepper (or Serrano Pepper) (seeded and coarsely chopped)
-
2 cloves Garlic (coarsely chopped)
-
1/4 teaspoon Ground Cumin
-
Salt (to taste)
-
Black Pepper (to taste)
Instructions
-
Step 1
Add the undrained diced tomatoes to your blender. -
Step 2
Add the coarsely chopped red onion, cilantro, lime zest, lime juice, and seeded and coarsely chopped jalapeno pepper ( or serrano pepper) to the blender. -
Step 3
Add the coarsely chopped garlic cloves and ground cumin to the blender. -
Step 4
Secure the lid and blend the ingredients until the salsa reaches your desired consistency. For a chunkier salsa, pulse a few times. For a smoother salsa, blend longer. -
Step 5
Season with salt and black pepper to taste. Blend briefly again to incorporate. -
Step 6
For best flavor, transfer the salsa to a bowl, cover, and refrigerate for at least 15-30 minutes before serving to allow the flavors to meld.
Important Information
Nutrition Facts (Per Serving)
It is important to consider this information as approximate and not to use it as definitive health advice.
Allergy Information
Please check ingredients for potential allergens and consult a health professional if in doubt.