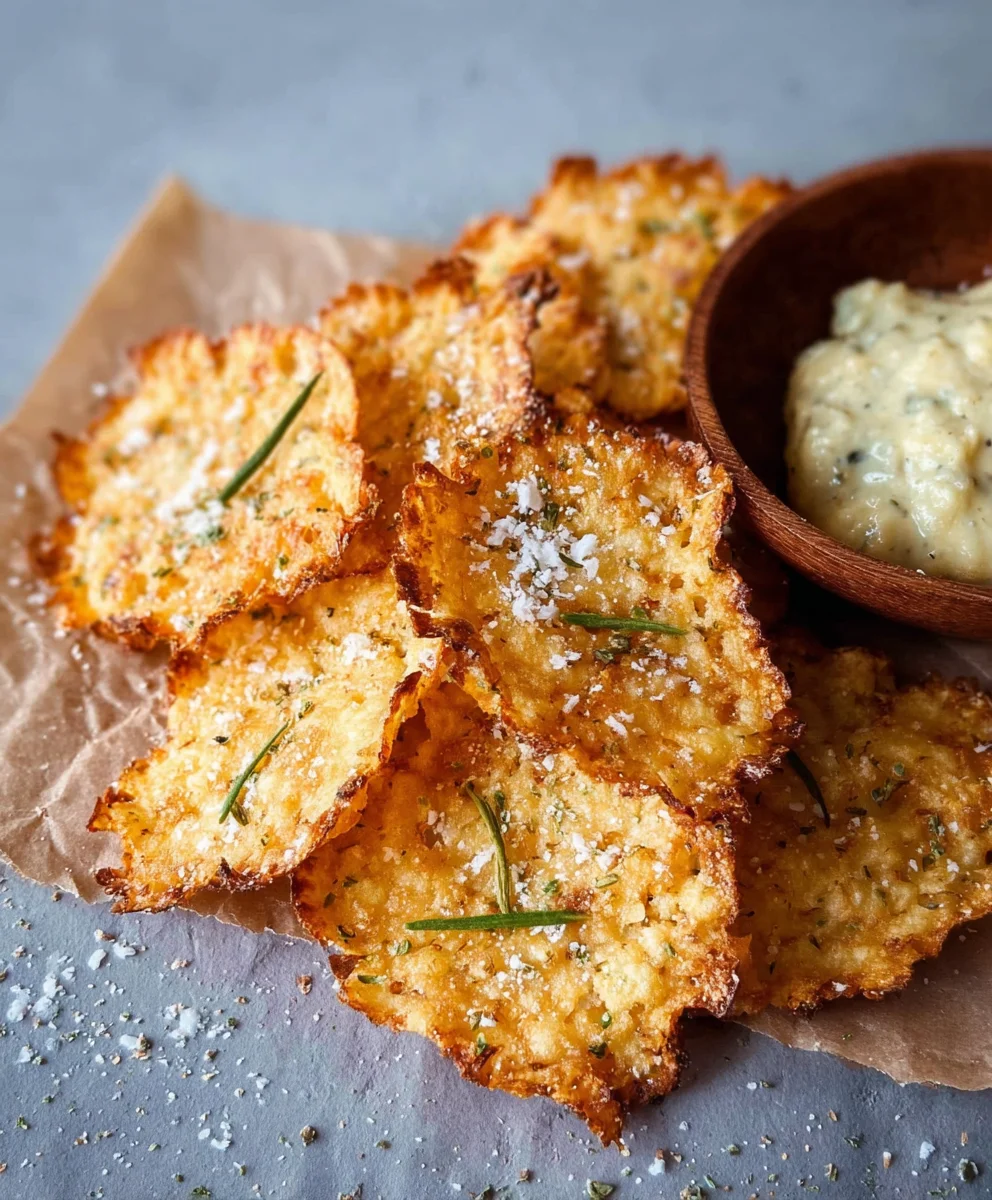
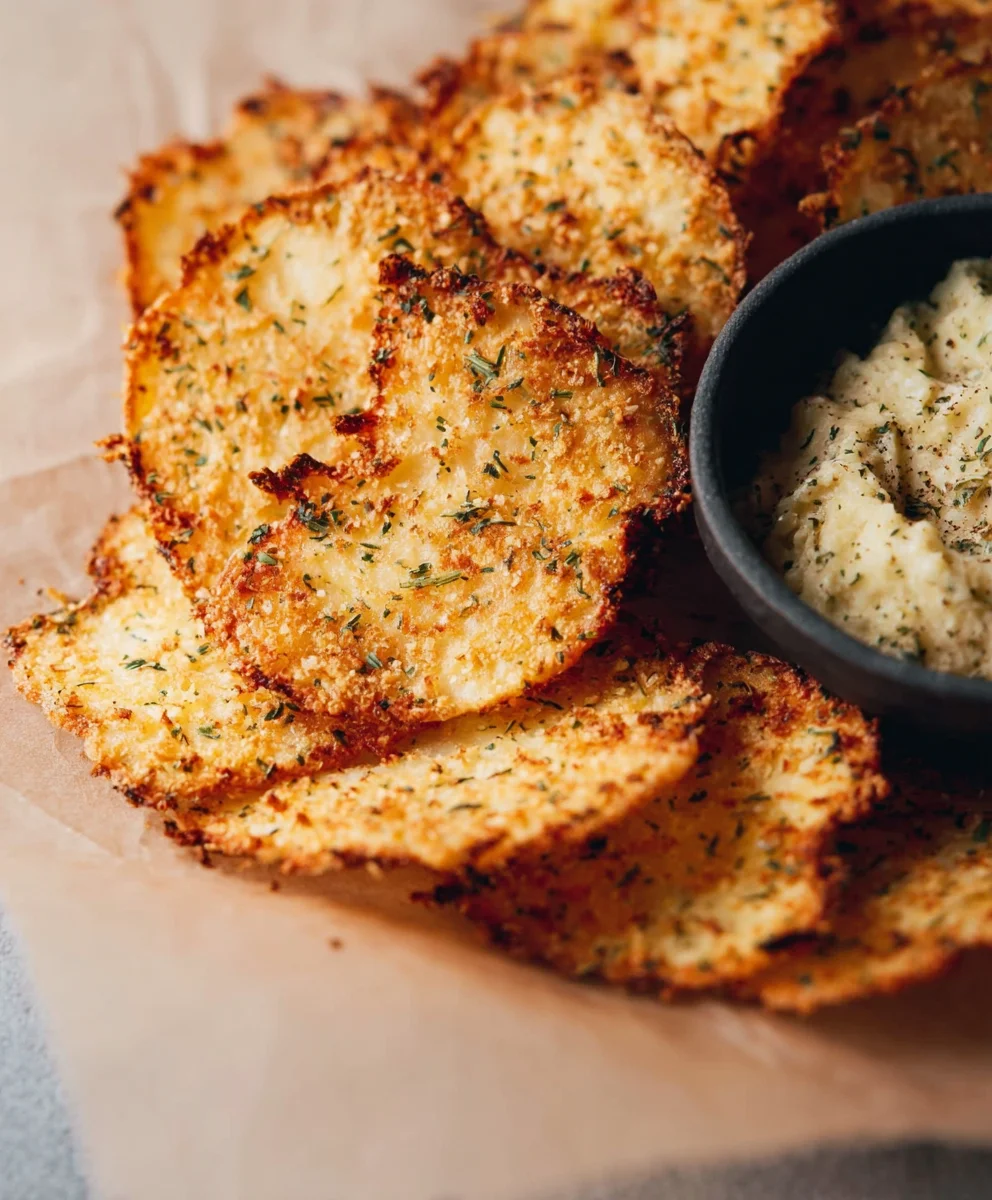
Crispy Cottage Cheese Chips – Easy Healthy Snack
Cottage cheese chips are an absolute game-changer when it comes to finding delicious, guilt-free snacks. Forget those bland, dry crackers or the handful of nuts that leave you feeling unsatisfied. We’re talking about a crispy, savory delight that’s packed with protein and surprisingly easy to whip up right in your own kitchen. Why have people fallen so head-over-heels for this innovative treat? It’s the perfect marriage of satisfying crunch and subtle, creamy flavor, making them incredibly addictive. Plus, they’re wonderfully versatile – perfect for dipping, crum extractbling over salads, or just enjoying on their own. What truly sets our cottage cheese chips apart is their remarkable simplicity and the incredible nutritional punch they pack. They’re a brilliant way to incorporate more protein into your diet without sacrificing flavor or that essential satisfying texture we all crave in a good snack. Get ready to discover your new favorite healthy obsession with these amazing cottage cheese chips.
Ingredients:
- 2 cups cottage cheese
- 2 large eggs
- 1/2 cup grated Parmesan cheese
- 1/4 cup nutritional yeast
- 1 teaspoon garlic powder
- 1/2 teaspoon onion powder
- 1/4 teaspoon smoked paprika
- Pinch of cayenne pepper (optional, for a little heat)
- Sea salt, to taste
- Freshly ground black pepper, to taste
- Optional toppings: Everything bagel seasoning, dried herbs (like rosemary or thyme), chili flakes
Preparing the Dough
The foundation of these incredibly satisfying cottage cheese chips lies in a simple yet ingenious dough that transforms humble cottage cheese into a crispy, savory snack. This process is surprisingly straightforward and requires minimal culinary expertise. Let’s get started by preheating your oven to 375°F (190°C). While the oven heats up, prepare your baking sheets. Line two large baking sheets with parchment paper. This is crucial for preventing the chips from sticking and ensuring an even bake, which is key to achieving that perfect crispiness.
Now, let’s focus on the cottage cheese. It’s important to use full-fat cottage cheese for the best texture and flavor. The higher fat content contributes to a richer taste and helps the chips achieve a desirable crispness. Place the 2 cups of cottage cheese into a medium-sized mixing bowl. If your cottage cheese has a lot of liquid, you might want to drain some of it off before proceeding. This helps prevent the dough from becoming too wet.
Next, add the 2 large eggs to the bowl with the cottage cheese. The eggs act as a binder, holding all the ingredients together and contributing to the structure of the chips. Whisk the cottage cheese and eggs together until they are well combined and relatively smooth. Don’t worry if there are a few small lumps of cottage cheese remaining; they will soften during the baking process.
Now it’s time to add the flavor. Sprinkle in the 1/2 cup of grated Parmesan cheese. The Parmesan not only adds a salty, nutty depth of flavor but also aids in the crisping process as it browns in the oven. Follow this with the 1/4 cup of nutritional yeast. Nutritional yeast is a fantastic ingredient for adding a cheesy, umami flavor without any dairy. It’s a staple for many plant-based diets and works wonderfully here to boost the savory profile of these chips.
For our aromatic elements, add the 1 teaspoon of garlic powder and the 1/2 teaspoon of onion powder. These pantry staples provide a warm, savory base that complements the cheese and cottage cheese beautifully. Next, introduce the 1/4 teaspoon of smoked paprika. The smoked paprika imparts a subtle smokiness and a beautiful reddish hue to the chips, making them visually appealing and deliciously complex. If you enjoy a bit of a kick, now is the time to add a pinch of cayenne pepper. This is entirely optional, but it adds a lovely warmth that can be quite addictive.
Finally, season generously with sea salt and freshly ground black pepper to taste. Remember that the Parmesan cheese is already salty, so start with a moderate amount of salt and adjust as needed. Mix all the ingredients thoroughly until everything is evenly distributed. You should have a thick, somewhat sticky batter.
Shaping and Baking the Chips
With your batter ready, it’s time to shape these into individual chips. This step is where your creativity can shine, but consistency is key for even baking. You have a couple of options here, both yielding great results.
One method is to use two spoons. Take a small spoonful of the batter and drop it onto the prepared baking sheet, spacing the mounds about 1 to 1.5 inches apart. You can then use the back of the spoon to gently flatten each mound into a thin disc. Aim for a uniform thickness of about 1/8 to 1/4 inch. Thinness is crucial for achieving that delightful crispness. Thicker chips will tend to be chewier.
Alternatively, for a more uniform shape, you can use a piping bag. Transfer the batter to a piping bag fitted with a round tip. Pipe small rounds onto the parchment paper, again leaving plenty of space between each one. This method allows for more control over the size and shape of your chips.
If you’re using optional toppings, this is the perfect time to sprinkle them over the piped or spooned mounds. Whether it’s the robust flavor of everything bagel seasoning, the fragrant notes of dried rosemary or thyme, or the fiery zest of chili flakes, adding toppings now will ensure they adhere to the chips as they bake.
Once your baking sheets are filled with dough mounds, carefully place them into the preheated oven. Bake for 20-25 minutes. The exact baking time will depend on the thickness of your chips and your oven. You’ll know they’re ready when the edges are golden brown and the chips appear set and slightly puffed. They might still feel a little soft in the center when they first come out, but they will crisp up considerably as they cool.
For an extra crisp texture, you can flip the chips halfway through the baking process. This allows both sides to brown and crisp up evenly. To do this, carefully remove the baking sheets from the oven, flip each chip with a spatula, and return them to the oven to finish baking.
Cooling and Enjoying
After the baking time is complete, remove the baking sheets from the oven. Let the cottage cheese chips cool on the baking sheets for about 5-10 minutes. During this time, they will continue to firm up and become even crispier. Once they have cooled slightly and are easier to handle, carefully transfer them to a wire rack to cool completely. This is important to prevent steam from accumulating and making them soggy. Allow them to cool fully on the wire rack – this final cooling stage is critical for achieving that satisfying crunch you’re aiming for. As they cool, you’ll hear them crackle and pop, a delightful sound of success!
Once completely cool, your homemade cottage cheese chips are ready to be enjoyed. They are best eaten within a day or two of baking for maximum crispness. Store any leftovers in an airtight container at room temperature. These delightful chips are a fantastic low-carb, high-protein snack that’s incredibly versatile. They can be enjoyed on their own, served with your favorite dips like guacamole or hummus, or even crum extractbled over salads for added texture and flavor. Experiment with different seasoning blends to discover your favorite flavor combinations. The possibilities are truly endless with these simple yet remarkably delicious cottage cheese chips.
Conclusion:
There you have it! Crafting your own Cottage Cheese Chips is a rewarding and surprisingly simple process that yields a delicious and versatile snack. We’ve explored how to achieve that perfect crispy texture, offering a healthier alternative to traditional potato chips. Whether you’re looking for a guilt-free movie night treat, a crunchy addition to your salads, or a dippable delight, these Cottage Cheese Chips are sure to become a staple in your kitchen. Don’t be afraid to experiment with different seasonings – the possibilities are endless!
For serving, these Cottage Cheese Chips are fantastic on their own, but they also pair wonderfully with your favorite dips like hummus, guacamole, or a creamy ranch. Try them crum extractbled over soups or as a base for mini appetizers. Variations are where these chips truly shine! Consider adding a pinch of smoked paprika for a smoky kick, or some dried herbs like rosemary or thyme for an aromatic twist. A sprinkle of garlic powder or onion powder also elevates the flavor profile beautifully. Go ahead, get creative, and make these Cottage Cheese Chips your own!
Frequently Asked Questions about Cottage Cheese Chips:
Q: How can I make my Cottage Cheese Chips even crispier?
A: To ensure maximum crispiness, make sure to spread the cottage cheese mixture thinly and evenly on the baking sheet. Don’t overcrowd the pan, as this can lead to steaming rather than crisping. Also, be sure to bake them until they are golden brown and fully dried out. You might even consider flipping them halfway through the baking process for even crisping on both sides.
Q: Can I use a different type of cottage cheese?
A: While regular cottage cheese works perfectly, you can also experiment with low-fat or fat-free versions. However, be aware that the fat content can slightly influence the texture and crispiness. Some people also find that blending the cottage cheese beforehand helps to create a smoother, more uniform base for the chips.
Crispy Cottage Cheese Chips – Easy Healthy Snack
Transform cottage cheese into a crispy, savory, low-carb, high-protein snack with this easy recipe.
Ingredients
-
2 cups cottage cheese
-
2 large eggs
-
1/2 cup grated Parmesan cheese
-
1/4 cup nutritional yeast
-
1 teaspoon garlic powder
-
1/2 teaspoon onion powder
-
1/4 teaspoon smoked paprika
-
Pinch of cayenne pepper (optional)
-
Sea salt, to taste
-
Freshly ground black pepper, to taste
-
Optional toppings: Everything bagel seasoning, dried herbs, chili flakes
Instructions
-
Step 1
Preheat oven to 375°F (190°C) and line two large baking sheets with parchment paper. -
Step 2
In a medium bowl, combine 2 cups full-fat cottage cheese (drained if watery) and 2 large eggs. Whisk until well combined and relatively smooth. -
Step 3
Add 1/2 cup grated Parmesan cheese, 1/4 cup nutritional yeast, 1 teaspoon garlic powder, 1/2 teaspoon onion powder, 1/4 teaspoon smoked paprika, and a pinch of cayenne pepper (if using). Season with sea salt and black pepper to taste. Mix thoroughly until evenly distributed. -
Step 4
Drop small spoonfuls of the batter onto the prepared baking sheets, spacing about 1-1.5 inches apart. Gently flatten each mound into a thin disc (about 1/8 to 1/4 inch thick) with the back of a spoon. Alternatively, use a piping bag for uniform rounds. Sprinkle with optional toppings if desired. -
Step 5
Bake for 20-25 minutes, or until edges are golden brown and chips appear set. For extra crispiness, flip chips halfway through baking. -
Step 6
Let chips cool on the baking sheets for 5-10 minutes, then transfer to a wire rack to cool completely. They will crisp up significantly as they cool.
Important Information
Nutrition Facts (Per Serving)
It is important to consider this information as approximate and not to use it as definitive health advice.
Allergy Information
Please check ingredients for potential allergens and consult a health professional if in doubt.